Manage your uploaded videos in Video Manager
Video Manager provides tools and features to help you organize and make changes to your videos and account. To get there, you need to select Video Manager from your Creator Studio menu on the left hand side.
Navigating Video Manager
Along the left side of the page, you’ll notice a few different sections under Video Manager (if not, click on Video Manager to see them).
- Videos: Contains all of your uploads, and lets you make changes to them. Use the search bar to search by title, tag, keyword, privacy status, or upload date.
- Playlists: Find and edit your playlists
- Search History: Lists terms you’ve recently searched for – clear your history here
- Likes: A list of your liked videos. Save these videos to a playlist from this section.
Other sections will appear here depending on your account status. For example, Copyright Notices will appear if you havecopyright strikes or Content ID matches on any of your videos.
Using Video Manager
In the Videos section, you’ll find a list of all of your videos. Managing your videos can be done on a video-by-video basis or in bulk.
Make changes to a single video
From Creator Studio on your computer:
- Find the video you want to edit, by scrolling through the list or searching
- Click Edit below the video title
- Change your title, category, description, or another setting
- Return to Video Manager – status icons to the right of the video title reflect the changes
From the mobile YouTube Creator Studio App:
- Find the video you want to edit by scrolling through the list or searching
- Tap the video you’d like to review
- Tap Edit Video or the edit icon

- Change your title, description, tags, privacy setting, or another setting
- When finished tap Save and you’ll return to your list of videos
From the YouTube mobile app:
- Open Uploads from the guide
- Find the video you want to edit by scrolling through the list or searching
- Tap the menu for the video you’d like to edit
- Select Edit from the menu
- Make your changes and tap Save when finished
Change settings for multiple videos at once
Make use of the Actions btn to update multiple videos at once. You can change settings, change metadata (description, tags, titles, category), and much more. Bulk actions are currently only available on desktop.
- Use the checkboxes on the left side of the page to select the videos you want to edit
- With multiple videos selected, click Actions at the top of the page
- Click More actions to access a list of settings
- Click the setting you want to change, and set up your changes. Text like description, tags, and title can be appended to, removed, or replaced (“Set to”)
- Use Add actions to make multiple edits of different types
- Click Submit to confirm your changes
Download your own YouTube videos
Downloading other people’s YouTube videos is not allowed. However, you’ll always be able to download MP4s of videos you’ve uploaded. You can download your own uploaded videos from a computer.
How to download an MP4 of an upload
-
Go to your channel Video Manager
- Find the video you’d like to download.
- Click the arrow next to Edit to open a drop-down menu.
- Click Download MP4.
Why can’t I download my video?
You won’t be able to download your videos under the following circumstances:
- Your video has been removed from YouTube
- You’re using a pre-approved audio track
- Your video has copyrighted content
- You’ve already downloaded two videos in the last hour — you can only download an individual video up to five times per day. Once a day has passed, the Download MP4 btn will appear again.
Delete your own videos
You can delete the videos you uploaded to your YouTube channel.
- Sign in to YouTube.
- Open the
 Guide in the upper left corner and go to Uploads.
 - Find the video you want to delete. Touch the menu icon to the right of the video details.
- Choose Delete.
- Sign in to YouTube.
- Open the Guide in the upper left corner and go to My Channel.
- Select the Videos tab to see your uploaded videos.
- Find the video you want to delete. Touch the menu icon to the right of the video details.
- Choose Delete.
 Guide in the upper left corner and go to My Channel.
 menu icon to the right of the video details.
 Delete.
- Go to your Video Manager.
- Click the checkboxes next to the videos you want to delete (multiple videos can be deleted at once).
- Click Actions at the top of the Video Manager, then Delete.
Unfortunately, it currently isn’t possible to delete a video on the YouTube mobile site. If you have an Android or iOS device, you can use the Android or iOS YouTube app to delete videos. Otherwise, you can access YouTube on a computer to do so.
Nobody will be able to view the video after you delete it; however, it may take some time for video search results and thumbnail images to disappear.
You can only remove videos that you have uploaded yourself. To report abuse, harassment, inappropriate content, or privacy complaints, please visit the Safety Center. For copyright concerns, please visit the Copyright Center.
Change video information and settings
How to change your video title, tags, viewing permissions, and more
Make basic (and more advanced) changes to your video through the “Info and Settings” page for your video. Here you can change everything from your video title to whether or not you want people to be able to comment on your video.
Using the “Info and Settings” page
Here’s how to navigate to the Info and Settings page.
- Go to your channel Video Manager
- You’ll see a list of your uploaded videos. Find the video you want to edit, then click Edit below the video title
Once you’re at the Info and Settings page, you’ll see three tabs, depending on your account type:
- Basic Info: Change title, description, tags, category, privacy
- Monetization: See Partner Help Center for more on monetizing videos
- Advanced Settings: Change comments permissions, license, caption, video location, recording date, 3D video
Most characters are valid to fill in the information in video fields (title, description, etc). The only characters that are not accepted in video fields are angle brackets.
Make bulk edits
Here’s how to make the same changes to multiple videos at once:
- Go to your channel Video Manager
- Check the boxes next to the videos you want to change the settings for
- At the top of the page, click Actions
- Select one of the available option or click More actions and choose the settings you want to change
- Select your changes and click Submit to confirm
On mobile devices
You can perform some basic video information editing on a single video from our mobile apps.
From the mobile YouTube Creator Studio App:
- Find the video you want to edit by scrolling through the list or searching
- Tap the video you’d like to review
- Tap Edit Video or the edit icon
- Change your title, description, tags, privacy setting, or another setting
- When finished tap Save and you’ll return to your list of videos
From the YouTube mobile app:
- Open Uploads from the guide
- Find the video you want to edit by scrolling through the list or searching
- Tap the menu for the video you’d like to edit
- Select Edit from the menu
- Make your changes and click Save when finished
Replace videos
Unfortunately, you won’t be able to replace an old video with a new one and keep the original view count, comments or ratings. Instead, you may want to try using annotations or link to the new version of the video from your old video.
You can also make changes to a video you’ve already uploaded by using YouTube Video Enhancements. (In order to be eligible for YouTube Video Enhancements, your video must not have received more than 1,000 views and not have aContent ID Match.)
Video distribution settings
How to set distribution settings
You can choose to make your videos available on all platforms or monetized platforms only. The distribution setting will be found in the video’s Metadata Editor. To access the Editor, go to your Video Manager, find the video that needs new settings, and click the Edit btn. Here are a few additional notes regarding distribution:
- Users who are not monetizing partners cannot change the distribution setting in the Advanced Settings tab of Video Manager.
- If a user’s video is a claimed video, the distribution setting of the claimant, not the user, will apply.
- If a user’s video is a video with a claim to the music contained within that video, the distribution setting of the claimant, not the user, will apply to the video.
Difference between monetized platforms and all platforms
The following platforms are examples of platforms we consider monetized:
- www.youtube.com
- YouTube app on Android and iOS
- YouTube app on TVs including Xbox, Google TV, PlayStation, and Chromecast
- m.youtube.com accessed from most smartphones
In addition to monetized platforms mentioned above, “all platforms” include but are not limited to the following:
- YouTube app pre-installed on iOS 5 and below
- YouTube app on Apple TV
- YouTube legacy apps on feature phones and TVs
- m.youtube.com accessed from feature phones
Advanced search in Video Manager
Advanced search operators give you more tools to search for videos in My Videos. Using these operators, you can make specific searches in Video Manager to pull up just the right video you want to see.
To use an advanced search operator, just type it into the search box at your My Videos page and hit enter. Some operators will require you to enter in a term to search, like a word in a video title or description. Don’t forget that!
For a list of all search operators, what they do, and examples, see the list below.
| Search operator | What it does |
|---|---|
| is:public, is:private, is:unlisted, is:draft | Searches for videos that are public, private, or unlisted as well as those videos uploaded as draft but not yet published. |
| tag: | Searches for videos with a tag that you give it. Example: Search for “tag:games” and everything with that tag appear |
| ## | Another version of the tag search. Type the name of your tag in quotes after ## to search for that tag. Example: ##”Game Reviews” |
| length>, length>=, length=, length<=, length< | Searches for videos according to length in seconds. Example: “length>60” searches for any video longer than sixty seconds. These can be used in combination – “length>60 length<100” finds any video longer than 60 seconds but shorter than 100. |
| before:, after: | Searches for videos based on when you uploaded them. Example: “after:2012-03-01” will return anything upload after March 1, 2012. |
| title: | Searches for videos according to contents of the title. Example: “title:food” will return any video that has the word “food” in the title. |
| description: | Searches within the description of your videos. Example: “description:food” will show you videos that have the word “food” in their description. |
| – | Use a hyphen to exclude something from your search. This can be used in combination with other search terms. Example: “title:BIG -is:private” will show you videos that have the word “big” in the title and aren’t private. |
| OR | Use OR (in all caps) to search for videos matching one term or another. Example: “title:BIG OR title:food” will return videos that have either “big” or “food” in the title. |
| () | Use parentheses to group words together when using a search operator. Example: “title:(BIG food)” will return videos with “big” and “food” in their title. |
| is:paid | Searches for videos that require a paid subscription to view (This feature not available in all countries.) |
| {} | Put the braces around video IDs to search for videos in bulk that match those video IDs. Example: {video ID A, video ID B, video ID C} will return videos A, B, and C. |
Using the Creator Dashboard
The YouTube Creator Dashboard gives you a high-level overview of recent activity on your channel and what’s new and interesting on YouTube, all in a single page.
To access the Creator Dashboard, simply navigate to the Video Manager and click on the Dashboard tab, or head directly to youtube.com/dashboard.
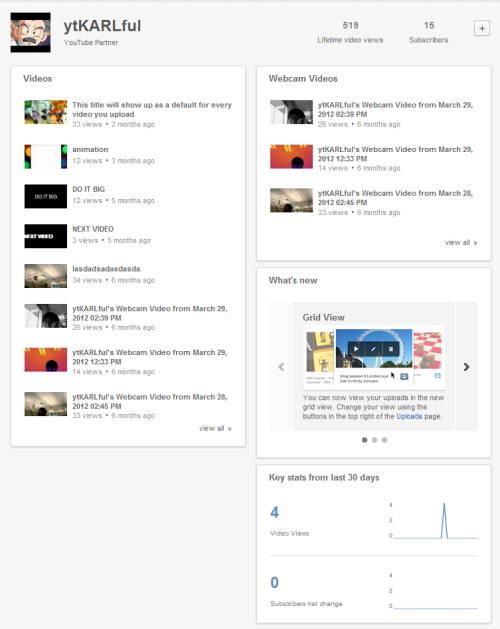
 At the top, you’ll see your current subscriber count, your lifetime video views, and, in case you forgot, when you first joined Youtube.
Below are four sections:
- Videos
- Comments
- Key stats from the last 30 days
- What’s new
The Videos section displays your four most recent uploads. Hover over the video title to bring up an Edit btn. Click on it to go straight to the info and settings page where you can change your video’s metadata, privacy settings and more. A View all btn at the bottom of the uploads section takes you to your full uploads page.
The Comments section displays the most recent comments on your videos. From here you can give a comment a thumbs up or thumbs down, and reply directly to the comment by clicking Reply. Using the Reply btn will take you to the video page for the comment and open up a comments box directly to use.
The Analytics section displays two high-level analytics for your channel: Video views in the last 30 days, and subscriber change in the last thirty days. Changes in these metrics are displayed using the line graph over time, to give you a quick and easy way to get a sense of your channel’s performance. Clicking on either chart will take you to the Analytics page where you can see more metrics on your channel in detail.
Finally, the What’s new section showcases recent news about product updates on YouTube. We’ll be updating this section to keep you up-to-date on the new and valuable YouTube info.
Your Dashboard can be customized to give you a personalized view of what’s relevant and interesting to you. You can select which widgets appear on the page, and, in some cases, customize what shows up in each widget type.
To move or remove a widget, simply hover over the top area of the widget where the name of the widget appears. You’ll see two icons appear on the right side of the title.
![]() Your mouse cursor will turn to a grabber icon when moved over the grid of squares that indicate you can grab and move the widget. Hold down on your left mouse btn, and you’ll have control over the widget’s placement. Drag the widget to where you’d like it on the page. Other widgets will move automatically to adjust to your new placement.
Your mouse cursor will turn to a grabber icon when moved over the grid of squares that indicate you can grab and move the widget. Hold down on your left mouse btn, and you’ll have control over the widget’s placement. Drag the widget to where you’d like it on the page. Other widgets will move automatically to adjust to your new placement.
To the right of the draggable area, a gear icon or x btn will appear. If there’s an X, the widget can be removed from your dashboard by clicking this btn.
To customize the content of a widget, click on the gear btn to access the widget menu.
Only Comments and Videos widgets are customizable. The Comments widget can be set to display different numbers of comments. The Videos widget can be customized for quantity, title, and more.
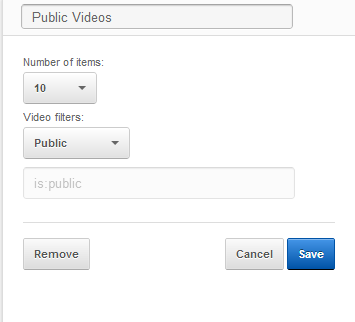
- Title: Set your widget title by typing your preferred title in the field at the top. In the above example, we’ve replaced “Videos” with “Public videos.”
- Number of items: Choose how many videos you want the widget to contain – it can display a maximum of 20 videos.
- Video filters: To specify what content you want in this widget, make use of video filters. The default filters allow you to filter by privacy – select the custom filter and use the advanced search parameters to customize by video metadata like title, description, upload date, length, and more.
In this example, we’ve created a custom widget for videos with the word “webcam” in the title by selecting a custom filter and entering “title:webcam” into the custom filter field. We also set the number of videos shown to only be three.
 Make use of the different options to customize and make your Dashboard unique and useful to your needs.
Customize the Creator Dashboard
Your Dashboard can be customized from your computer to give you a personalized view of what’s relevant and interesting to you. You can select which widgets appear on the page, and, in some cases, customize what shows up in each widget type. Make use of the different options to customize and make your Dashboard unique and useful to your needs.
Adjust the widgets
To move or remove a widget, simply hover over the top area of the widget where the name of the widget appears. You’ll see two icons appear on the right side of the title.

Your mouse cursor will turn to a grabber icon when moved over the grid of squares that indicate you can grab and move the widget. Hold down on your left mouse btn, and you’ll have control over the widget’s placement. Drag the widget to where you’d like it on the page. Other widgets will move automatically to adjust to your new placement.
Customize your widget content
To customize the content of a widget, click on the gear btn to access the widget menu.
Only Comments and Videos widgets are customizable. The Comments widget can be set to display different numbers of comments. The Videos widget can be customized for quantity, title, and more.

-
Title: Set your widget title by typing your preferred title in the field at the top. In the above example, we’ve replaced “Videos” with “Public videos.”
-
Number of items: Choose how many videos you want the widget to contain – it can display a maximum of 20 videos.
-
Video filters: To specify what content you want in this widget, make use of video filters. The default filters allow you to filter by privacy – select the “custom” filter and use the advanced search parameters to customize by video metadata like title, description, upload date, length, and more.
In this example, we’ve created a custom widget for videos with the word “webcam” in the title by selecting a custom filter and entering “title:webcam” into the custom filter field. We also set the number of videos shown to only be three.

Removing a widget
To remove a widget from your dashboard, hover over the top area of the widget where the name of the widget appears. If the widget can be removed from your dashboard you will see an “x” in the upper right corner which you may select to remove the widget.
Video thumbnails
Video thumbnails let people see a quick snapshot of your video. After your video is finished uploading, you’ll be able to choose a thumbnail from the three options YouTube automatically generates. To select the one you’d like to use, simply click the thumbnail and click Save changes.
Here’s how to change a thumbnail at any time:
-
Go to your channel Video Manager
- Click Edit for the corresponding video you’d like to change.
Custom video thumbnails
If your account is verified and in good standing, you may have the ability to upload custom thumbnails for your video uploads.
Uploading custom thumbnails
To upload a custom thumbnail when you upload a video:
- Record or upload your video.
- At the end of the video processing stage in the upload interface, you will see an option to choose a Custom thumbnail under the “Video thumbnails” section.
To upload a custom thumbnail for an existing video:
- Go to your channel Video Manager.
- Locate a video and click the Edit btn.
- Click the Custom thumbnail btn and upload a thumbnail.
- Once the thumbnail is uploaded, don’t forget to click the “Save Changes” btn.
Custom thumbnail best practices
Size
Your custom thumbnail image should be as large as possible, as the image will also be used as the preview image in the embedded player. We recommend your custom thumbnails:
- Have a resolution of 1280×720 (with minimum width of 640 pixels).
- Be uploaded in image formats such as .JPG, .GIF, .BMP, or .PNG.
- Remain under the 2MB limit.
- Try to use a 16:9 aspect ratio as it’s the most used in YouTube players and previews.
Policy
The ability to upload custom thumbnails may be revoked for creators who consistently use thumbnails that don’t follow our guidelines. If your thumbnail privileges have been revoked, we will not be able to restore this privilege.
Frozen view count
Why is the video view count stuck?
Sometimes you might see that the video viewcount isn’t showing all the views you expect. Video views are algorithmically validated to be fair to both content creators and advertisers and maintain a positive user experience. This process assures that the video views are quality views and discards the low quality playbacks.
We want to make sure that all views are validated so during this process the views update less frequently and might occasionally freeze above 300 views to assure quality view count. This is the normal operation in YouTube videos.
Your content on YouTube Kids
You have ultimate control over the display of your content on YouTube, and you may exercise that control at any time by removing your content. If you have concerns about the availability of your content in YouTube Kids specifically, you may submit a request to remove specific content on your channel from YouTube Kids.
Please note that this form may only be submitted by the uploader of the content in question. In order to verify that you are the uploader you must be logged into the account that was used to upload the video(s).