Annotations help you engage with viewers and make your videos more interactive. Learn more about using annotations in your videos and adding InVideo programming across your YouTube channel.
Create and edit annotations
With annotations you can layer text, links, and hotspots over your video. They help you enrich the video experience by adding information, interactivity and engagement.
Create an annotation
Here’s how to access annotations and add them to your video:
-
Go to your channel Video Manager
- Next to the video you wish to edit, click the down arrow to the right of the Edit btn and select Annotations
- Click the Add annotation btn on the right.
- Click Apply changes when you’ve finished creating your annotations.
Customize and edit annotations
There are five different types of annotations to choose from:
- Speech bubble: for creating pop-up speech bubbles with text.
- Spotlight: for highlighting areas in a video; when the user moves the mouse over these areas the text you enter will appear.
- Note: for creating pop-up boxes containing text.
- Title: for creating a text overlay to title your video.
- Label: for creating a label to call out and name a specific part of your video.
- “Pause” annotations are no longer available. Moving forward, your old pause annotations will continue to work, but you will not be able to create new ones.
Once you’ve chosen which type of annotation you want to insert, use the settings underneath the “Add annotation” btn to change the font size, color, or background color.
Position the annotation on the video by dragging and dropping it within the video player. Use the small black squares on the corners of the annotation to make them bigger or smaller. Annotations have a size limit and they are only allowed to cover up to 30% of the player size. You won’t be able to increase the size of the annotations after that point.
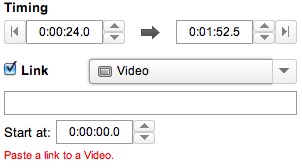
Determine when you want to the annotation to appear by using the “Start” and “End” settings on the right side. Or, you can move the annotations around on the timeline underneath the video.
Note: links to specific times may not be precise. The encodings we use for video streaming typically have keyframes every two seconds and it is only possible to seek the player to keyframes.
Where annotations do (and don’t) show up
Annotations appear on standard YouTube players and embedded players.
Annotations do not appear on custom YouTube chromeless players, or on mobile, tablet and TV devices.
Advanced tips for annotations usage
Annotations allow you to hold a dialog with your viewers by encouraging them to take an action while they’re watching a video. When used correctly, annotations can improve engagement, viewership, and help you grow your audience.
However, incorrect usage of annotations can be distracting, which may ultimately turn viewers away.
While only you know what works best for your video and your audience, here are some tips which have been found to work with many types of content, and with different audiences.
When watching a video, ideally the video should take center stage, and capture the viewer’s attention and focus. Text pop-ups and clickable hotspots on the video can easily detract from the viewing experience, so these should be used carefully. A good starting point is to understand what viewers look for in annotations.
| supplement and enrich the video | distract and reduce the perceived quality of the video |
| aren’t overly invasive | take over the video |
| are contextually relevant and give value to viewers | only serve the video creator (often perceived as spam) |
There are certain situations in which it may be beneficial for annotations to temporarily become the central focus. Examples include: link menus, games, quizzes, annotation art, etc.
In all other cases though, it’s best to make annotations secondary to the video and minimally intrusive.
Here’s how:
- Duration: Annotations should only be displayed for the amount of time needed to read them. Showing annotations for any longer period of time could be distracting to the user and perceived as annoying. In most cases 5-7 seconds is sufficient for the viewer to read annotations.
- Size: Try to make your annotations small so that they block as little of the video as possible. Annotations that take up all or most of the video area should be avoided.
- Color: Vibrant fill colors such as red, yellow, blue, orange and pink are likely to be eye-catching, to distract viewers and to create a feeling of clutter. Use these types of colors only when annotations need to be the center attention. In all other cases muted colors (transparent, semi-transparent, gray, white and black) work best.
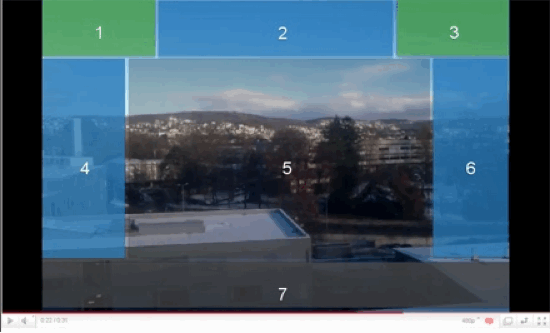
- Position: If possible, position your annotations on the borders of the video and away from the center of the video. The image below shows the best positioning for your annotations.
 The best locations to put your annotations are the top corners of the video area (see positions 1 and 3 in the image above). Annotations can also be placed on the top and side borders of the video (see positions 2, 4 and 6). The center area of the video (see position 5) is best left without annotations to avoid obscuring the video. Placing annotations at the bottom of the video (see position 7) is also not recommended as annotations here may be hidden by closed-captioning (subtitles) and ads.
 The best locations to put your annotations are the top corners of the video area (see positions 1 and 3 in the image above). Annotations can also be placed on the top and side borders of the video (see positions 2, 4 and 6). The center area of the video (see position 5) is best left without annotations to avoid obscuring the video. Placing annotations at the bottom of the video (see position 7) is also not recommended as annotations here may be hidden by closed-captioning (subtitles) and ads.
- Number of annotations: Use the fewest number of annotations in a video at any given time. Try not to show more than two at a time.
- Length of text: Keep your annotations as short as possible so viewers will be able to read them at a glance and get back to watching the video.
- Writing in ALL CAPS: Using every word in capital letters may be considered as loud or rude by some viewers.
When watching sports and game shows on television we are shown a fair amount of text on the screen (game scores, statistics, time, people’s names etc.). This is not considered distracting or invasive as the information is relevant and useful. On the other hand, receiving a high volume of promotional messages or calls for action will not be seen favorably. As a viewer, we do not like being interrupted with messages which are out of context or which contribute little value to us.
The same rules apply to annotations:
- Add value: create annotations that add value to the viewing experience rather than detract from it: supplementary information, links, better navigation, interactivity, entertainment and so on. Your audience will appreciate this and will return for more.
- Promotions and calls for action: minimize the number of calls to action (Subscribe, Favorite, Vote thumbs-up etc.) and promotional messages you put in a video. Try to place them towards its end. This will give viewers a chance to enjoy your content uninterrupted and to form a favorable opinion. A satisfied viewer is more likely to take favorable action and this will yield better results for you.
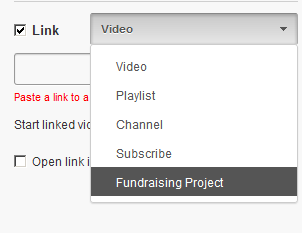
Notes, Speech Bubbles and Spotlights, can be linked to “content” (such as other videos, same video, channel pages, playlists, search results). Similarly, they can also be linked to “calls to action” (such as subscribe, compose message and upload video response). Here are some ideas and recommendations for using links:
- Use spotlight links rather than text links: Although adding links in Notes or Speech Bubbles may be the quickest way to add them to a video, another option is to put spotlight annotations around items in the videos. This will create a “clickable hotspot”. Some creators embed thumbnail images or video-in-video spots just for this purpose. This technique often yields better results with a much higher click-through rate than text links.
- Put video links at the end of your video: When viewers reach the end of a video they are confronted with the question “what shall I watch next?”. We recommend adding links at the end of your video so as to present these users with a set of links to related content (either yours or others’). Some YouTube creators find this a very effective way to cross-promote their content and to drive additional views.
- Make your video interactive: By using links in your videos you’ll create an experience and content that seem to respond to viewer commands. For example, you could present a video for a new car and present the user with multiple color options. Each color option takes the viewer to a different video of the car in the specified color.
- Create chapters: In long videos that contain multiple distinct sections, it’s a good idea to put a set of links at the beginning of each section. For example, at the start of a gadget review video there may be links to the chapters: “Unboxing”, “Specification”, “Charging” etc.. Then the viewer knows about available content and can choose videos which are relevant and of interest to them.
- Build branching storylines: One technique which is popular among viewers is branching storylines, also known as “choose your own adventure”. This involves creating a plot that spans multiple videos. At the end of each video the viewer is presented with a choice as to how to proceed – each option is a link to a subsequent video that matches this choice. This puts the viewers in charge, challenges them, gets them more involved and engaged.
- Add subscription links: A good way to add subscribers is to add a subscription link towards the end of a video, when viewers had a chance to appreciate the quality of your videos and are likely to want more.
- Use speech bubbles when appropriate: Speech bubbles can be a whimsical way to add speech or thoughts to characters in your video and to call out specifics. However, it is discouraged to use speech bubbles to point to btns on the YouTube watch page as a way of encouraging viewers to click on them. When viewed in the channel page, in embedded mode, or in full screen the watch page btns will not be visible, thus making the speech bubble irrelevant and confusing.
- Titles: Title annotations are useful for adding headings, captions, and other large text notes. They can be used at the beginning of your videos or of individual sections in it. Because of their size they should be used briefly and away from the center. .
- Consider colors: When choosing font color consider having it contrast with the background color in order to improve the viewer’s ability to read the text (for example black over white is better than yellow over white). If you use a transparent background in your annotation the font color should contrast well with the colors in the video.
Associated Website Annotations
Associated Website annotations provide creators a way to link to their associated websites directly from their videos. To enable Associated Website Annotations please make sure that your account fulfills these requirements:
- Your account is verified. You can verify your account in youtube.com/verify
- Your account needs to be in Good Standing. You can check if your channel meets this criteria on the YouTube Settings/Features page.
Create an Associated Website Annotation
Associate a website to your YouTube Account
To create an Associated Website annotation, first you need to complete these steps:
- Make sure your account is verified and in good standing before adding an associated website. You can verify your account in youtube.com/verify
- Add your website as an associate website in the Webmaster Tools. This will allow you to confirm that you own the site before you link it to your YouTube account.
- Include this website as the “Associated Website” in your YouTube account. Visit your Advanced Channel Settings and add the information in the “Associated website” section.
Once you have associated your main webpage to your YouTube account, you can associate more websites through theWebmaster Tools. You will be able to link your annotations to any of these domains. Learn more about adding more associated websites to your Google Account.
Add an Associated Website annotation
Now, you can enable Associated Website annotations and add them in your videos. Here is how:
- From your Video Manager, click the down arrow next to the “Edit” btn of the video you want to change, then clickAnnotations.
- If this is the first time you’re using external annotations, at the top of the menu you’ll see a banner that says “Enable your account for external annotation links.” Click the Enable btn and accept the Terms and Conditions.

- Once you’ve accepted the Terms and Conditions, click the Add annotation btn to create a new annotation, or select an existing annotation. Select the “Link” checkbox to add a URL, then select the category Associated Website.
- When you’ve placed your associated website link and have finished editing your annotation, select Save and/orPublish.

When both sides have finished this process, you will see “Success” on the account associated website page.
Please note that video playback stops when a viewer clicks an annotation in your video, which can impact your watch time metrics.
Associated Website annotations FAQ
My associated website appears as pending; what can I do?
Is it possible to associate more than one website?
To enable Associated Website Annotations you first need to associate one website to your account. After associating a website once to enable this feature in annotations, you can add more associated websites viaWebmaster tools. You will be able to link to these sites, annotations will just look at Webmaster Tools to see if the domain is allowed.
If you have problems adding associates in the webmaster tool, check these Webmaster help resources.
Why am I getting “Please enter a valid URL” when I enter the associated website?
Annotation link to Associated Websites is missing
Merch annotations
Merch annotations provide creators a way to promote their licensed merchandise directly in their videos. To use Merch annotations you need to verify your account and make sure it is in good standing. You can check if your channel meets this criteria on the YouTube Settings/Features
Enable external annotation links
To create Merch annotations, you first need to enable external annotation links:
- Navigate to your account Annotations tool.
- At the top of the menu you’ll see a banner that says “Enable your account for external annotation links.” Click the Enable btn on this banner.
- Accept the Terms & Conditions.
Create a Merch annotation
Once you’ve enabled external annotations links, you can create links from your videos to approved external retail sites where you sell related merchandise.
- From your Video Manager, click the downwards arrow next to the “Edit” btn of the video you want to change, then click Annotations.
- Click the Add annotation btn to create a new annotation, or select an existing annotation.
- Check the ‘Link’ checkbox to add a retail url, then choose the Merch category in the drop-down menu.
- When you’ve placed an approved retailer link and have finished editing your annotation, select Save and/or Publish.
Please note that video playback stops when a user clicks an annotation in your video, which can impact your watch time metrics.
Approved retailers and example links
Merch Annotations can link to your storefront or an individual product. URLs entered into the annotations editor must be formatted correctly in order to link correctly.
- Google Play: KarminMusic
- iTunes (accepts international links): KarminMusic
- Spreadshirt (accepts international links): TheFineBros/
- District Lines: MeekaKitty
- Topspin: OkGo
- Cafepress: GeekAndSundry
- Jinx: GeekAndSundry
- Shopify: EpicMealTime
- Songkick: KarminMusic
Other Approved Retailers: https://support.google.com/youtube/answer/2760471?hl=en&ref_topic=2795929
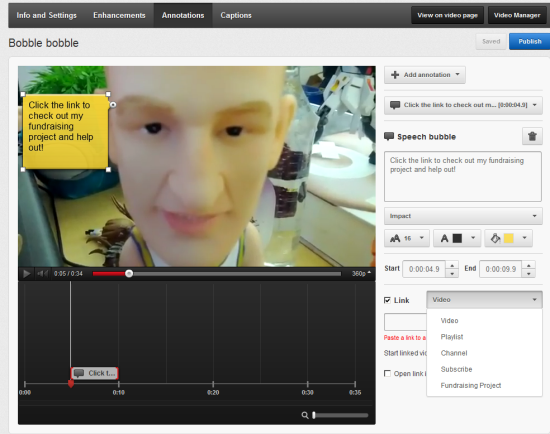
Link to fundraising sites through annotations
Annotations can be a great way to link viewers to projects on fundraising sites.
Sites we currently support for external fundraising links: https://support.google.com/youtube/answer/2648231?hl=en&ref_topic=2795929
Here is how to create an annotation with a link to a fundraising site:
- Go to your Video Manager
- Clicking the down arrow next to the Edit btn for the video you’d like to annotate and select Annotations
- Create an annotation by clicking Add annotation. Learn how to create and edit an annotation.

- Check the Link box at the bottom right of the edit annotation menu. Select Fundraising Project from the drop-down menu.

- Enter the URL for your project from one of the supported sites. Click Publish when you are finished.