Use YouTube enhancements to add effects and make edits to the videos you’ve uploaded. You can also use the YouTube Video Editor to easily to make a new video from other videos you’ve already uploaded.
Using Enhancements
If you’re on your computer, you can make tweaks and add effects to your videos directly on YouTube! You won’t need to reupload the video, and your video’s URL, view count, and comments will stay the same.
Here’s how to use video enhancements:
-
Go to your channel Video Manager
- Click the Edit btn for the video you want to edit
- Click Enhancements
- Make your changes
- When you’re done, click Save, or use Save as to create a new enhanced video, while keeping the original video untouched.
Enhancement options and features
Using enhancements, you can make some of the following improvements and edits to your videos.
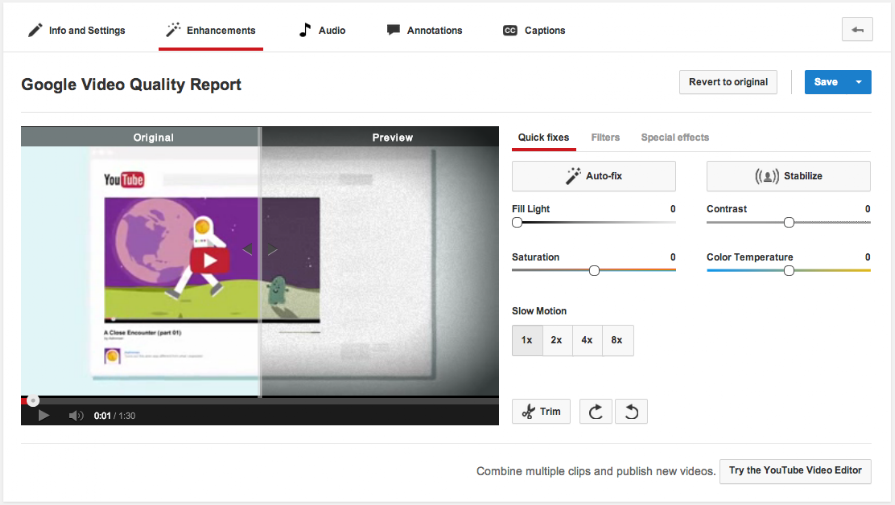
- Auto-fix: Performs a one click-fix to enhance the video’s lighting and color. You can also make manual adjustments toFill Light, Contrast, Saturation, and Color Temperature by using the sliders.
- Stabilize: Adjusts the video to correct any shakiness
- Slow Motion: Slow the speed at which your video plays (half speed, quarter speed, eighth speed)
- Trim: Clip parts off the beginning and/or end of your video
- Filters: This tab shows pre-set color filters that you can apply to your video to give them a stylish and unique look
- Face blurring: Protect the anonymity of people in your video. Click on Special effects to access this feature.
Preview how your video will look with the added enhancements in the video player by dragging the line in middle to see a side-by-side comparison. To revert all changes, click Revert to original.
Problems saving enhancements
In order to save changes on your video, your video must meet the following criteria:
- View count: Not have received over 100,000 views
- Time: Less than two hours long
- Content ID: Not have a Content ID Match
However, you can still choose to use Save As creating a new video with a new video URL that will contain the edits – you just won’t be able to save changes to the original video.
While the Enhancements tool can help make changes to existing videos, it does not support the ability to change out an existing upload with an entirely new video file.
Swap the audio track on your video
The audio swapping tool allows you to add music to your video from a library of licensed songs. Many of these songs are from our free Audio Library, and you may use them in videos that you monetize on YouTube. However, some of these songs are ad-supported, indicated by this icon  . If you use them, the owner’s ads may appear on your video, and you will not be able to monetize this video.
Adding audio tracks to your video
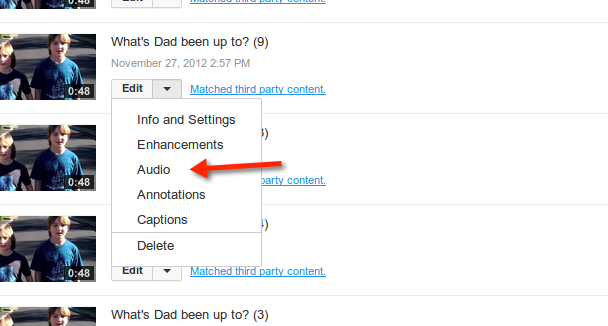
- Go to your Video Manager page, and click the arrow next to Edit on the video you’d like to edit
- In the drop-down menu, click the Audio btn
- Select a track by clicking on it and preview your video with the music track added
- Search for a track using the search box, or browse by genre using the Featured Tracks tab
- Once you’ve found a track you like, click the Save btn, and the new audio will be applied to your video. Audio tracks can be positioned in a precise part of your video using the position audio feature.
Customizing audio position and length
After selecting an audio track, click on the Position audio btn below the preview player. The name audio track will appear below the player in a highlighted bar. Click on the bar.
You can now trim and drag the bar to customize length and position by clicking on the beginning or end of the bar and dragging it to the left or right. After you’ve trimmed the track, drag it to a particular position in the video.
This feature allows you to set when an audio track will play in your video. You can adjust the volume of the audio to play music only, favor the original audio, or mix both.
Click Done positioning when you’re happy with the positioning of the track.
Remove Content ID claimed songs from my videos (beta)
If your video has matched a content owner’s music through Content ID, there may be restrictions on where and how the video is available, as well as whether you can monetize the video.
In some cases, you can remove this song, and the restrictions that come with it. This can often be done without muting the entire video, so your original audio will remain. Please note that even if you use this tool, you’re still responsible for any use of third-party content that may remain in your videos.
Removing tracks
To remove a track from a video with a copyright claim, go to Video Manager.
Find the video you want to remove a song from. Then, click on the arrow next to Edit and choose Audio.
 If the song in the video can be removed, you’ll see the “Remove a Song” menu at the bottom of the screen.
Click Remove this song, then Save your changes.
This will remove only the claimed audio, leaving other layers of audio intact. If that’s not possible, it will mute the portion of your video where the claimed audio appears. You’ll have to wait for the song erase to complete processing before you’ll know if the song removal was successful. These changes can be undone by clicking “Undo song removal”
Undoing song erasing and replacement
To undo the song removal:
- Find the video in Video Manager
- Click the arrow next to Edit, then Audio
- Click “Undo song removal” at the bottom of the screen
- Click Save
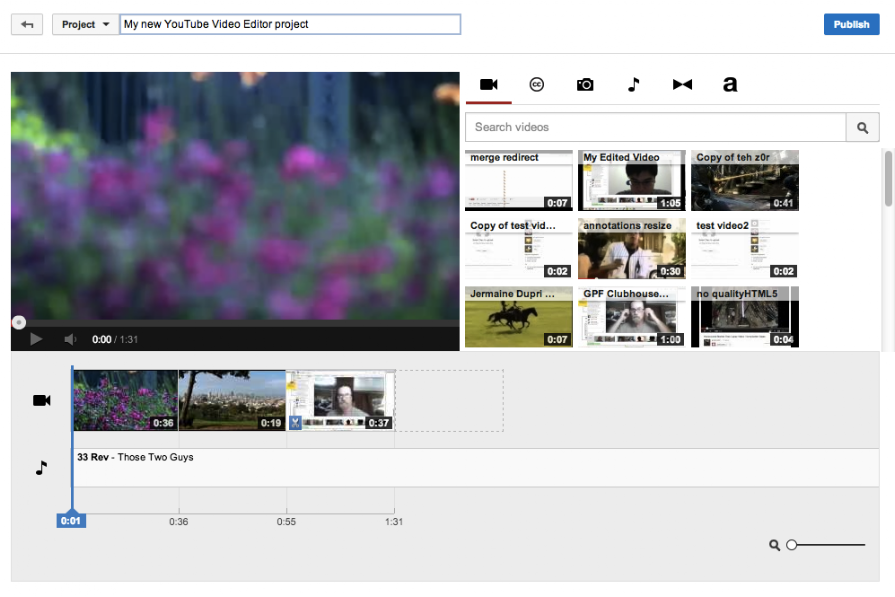
YouTube Video Editor
With the Video Editor, you can:
- Combine multiple videos and images you’ve uploaded to create a new video
- Trim your clips to custom lengths
- Add music to your video from a library of approved tracks
- Customize clips with special tools and effects
You can get to the Editor at http://www.youtube.com/editor.
Using these tools, you can put together clips to create new videos and publish them to YouTube with one click.
Here’s how to access the Video Editor:
- Sign in to your YouTube account
- Click the Upload btn at the top of the page
- Click Edit on the right of the upload page, under “Video Editor”
All of your uploads are added automatically to the Video Editor and can be used as a clip. Up to 50 clips and 500 images can be added to a project to create a new video.
Here’s how to add a video clip or image.
- Find the clip or image you want to add in the upper left of the Editor. Click the camera icon to browse images
- Move your mouse over the clip/image you want to add, then click the + btn
- Or, drag the clip/image to the bottom of the timeline at the bottom of the editor, where it says Drag videos here to begin editing when you start a new project
Once your clip is in the timeline, you can customize its length.
- Trim: Cut the length of your clip by moving your cursor over the edges of your video in the timeline. Drag the handles toward the center of the video to shorten.
- Lengthen: Drag the handles outward from the center of the video to lengthen. Lengthening past the original length of the video will result in the video repeating.
- Cut/Snip: Clips can be cut into portions. Move your mouse over the video and click the scissors icon to bring up the snip marker. Move this to where you want to snip the clip, then click on the scissors btn to snip the clip.
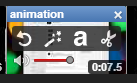
Here are some tweaks and enhancements you can make to clips.
- Rotate: Rotates your video 90 degrees
- Effects: Apply Video Enhancements to your video to color correct, stabilize, and add filters
- Text: Apply a text overlay on the clip
- Slow Motion: Modify the speed at which the clip plays
Move your mouse over a clip to bring up any of these options.
Customize volume
You can set volume levels for each clip in your project. Hover over a clip in your timeline and find the volume slider. Adjust the slider to lower the volume on the clip or music track.
Add music
You can add a new audio track to your video. Click the music note btn in the upper left of the editor to bring up YouTube’s library of pre-approved songs.
Browse the tracks by searching or filtering by artist and genre. When you’ve found a song you like, drag it to the timeline. Multiple tracks can be added to a project by dragging the song into the timeline.

Songs, like clips, can’t overlap – they can only come before or after each other.
The audio from an added track will overlap replace your clips’ original audio by default. To customize the volume at which an audio track plays over your clips, adjust the volume slider to at the far right of the name of the track to your preferred setting.
When you’re done creating your project, click Publish to upload the project. Check Video Manager to make any other changes.
Find music for your videos in Audio Library
The YouTube Audio Library is a collection of music and sound effects for YouTube creators to use in their videos.
Free music
Some of these are high-quality 320kbps tracks available to download and use royalty-free. You can find this music under the Free music tab. It won’t be claimed through Content ID if you use it in your video, which means you’ll be able to monetize.
When you apply to monetize a video that includes a track from the Free Music tab, you may be required to supply additional documentation to show you have commercial use rights to the music. In this case, please include the music’s exact title and a brief statement that you downloaded it from the YouTube Audio Library.
Ad-supported music
The Ad-supported music tab features music that copyright owners, like record labels, manage through Content ID. Copyright owners can decide how they want their music to be used on YouTube. You can search for music in the Audio Library and see how the owner’s policy will affect your video.
Review the copyright owner’s policy
You can follow these guidelines to see what will happen if you upload a video that includes certain music.
- Go to the Audio Library
- Click on the Ad-supported music tab
- Search for the music you want to use
- Once you find the music you want to use, you’ll see the copyright owner’s policy for videos that include it. There are a few types of policies you may see:
- Monetize: Ads will appear on your video and revenue will go to the copyright owner.
- Block worldwide: One or more copyright owners don’t allow use of the music, and your video will be unavailable on YouTube.
- Block in some countries: One or more copyright owners have restricted the countries in which the music is available, and your video won’t be viewable where the music is blocked.
Note: If you upload music listed in the Ad-supported tab, you won’t be able to monetize your video.
Copyright owners can change policies and issue copyright takedown notices under certain circumstances, so your video’s status may change in the future — it may even be removed from YouTube.
Policies displayed in the Audio Library describe only what will happen to your video if you publish it on YouTube. YouTube cannot give you information about legal liability or other issues that can occur off the platform. You may wish to consult a qualified attorney if you have questions about your use of music.
Using the Audio library
To use the Audio Library:
- Go to the Audio Library
- Use the menu at the top of the page to browse tracks by genre, duration, and more
- Blue bars show you how popular a track is
- When you’ve found a track you like, download it by clicking the arrow
- Add the track to your favorites for easy access