Generate a Secure Shell (SSH) key pair for an Aspera dropbox
YouTube requires that you connect to your YouTube dropbox using a Secure Shell (SSH) connection. SSH is a network protocol that ensures secure data transfer.
SSH authenticates you using public-key cryptography. You create a pair of keys: a private key that resides on your client computer and a public key that your dropbox server uses. Both keys have to be in place for your computer to connect to your dropbox.
You need to provide your partner representative with your public SSH key before he or she can create your dropbox. The public key is a string that starts with ssh-rsa, ends with your email address, and has a long generated string in the middle. For example:
ssh-rsa

AAAAB3NzaC1yc2EAAAADAQABAAABAQCXsM9ycbHV6E6t2L+B4p/uYHn9Q0jmu5gU XMYnFnnf4l39xrznfDo8KCASzRrqUkRnuzrno059CvZVzcljkbwWLzKKoE1EwbzH L3nYahMB4MdYNWhBbHbB+ybq6RNO7hkoKDBIQCfqQDY0FEB6sV3d3F1WYl0bAMjp 15yyZJzMKa/rRnZKWetHlcL1X+gFWmW2hQ93foPD463gb58/25GujjsS/tzjngw7 UJMVkm08U1QEY3z3DE/R++7ovJozTCzH0CTNDN0AH3/oSC3dmG+yDh3ZXFATjWjy PXJSOziNrp9TXgJhlqSmoHcPvpotMVjx21kIZ+T+SusQmnG+hK+L

us**@********in.com
To generate an SSH key for an Aspera dropbox:
- Open your Aspera client.
- From the Tools menu, select Manage Keys.
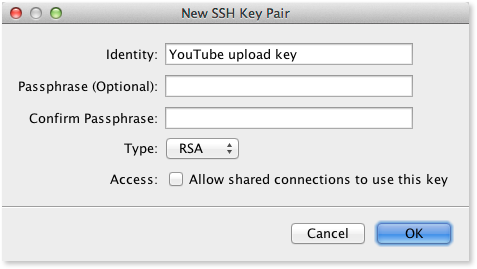
- In the SSH Keys window, click + to bring up the New SSH Key Pair window.
- Enter a name for this key pair in the Identity box.The key will appear in your list of SSH Keys using this Identity name.
- Set the Type drop-down list to RSA.
- Click OK to generate the key pair.Your new SSH key name appears in the list in the SSH Keys window, with the public key itself in the Public Key text box.
- Click Copy to Clipboard to copy the public key.
- Send the text of the key to your partner representative.You can paste the key from the clipboard into an email message.
- Click Close in the SSH Keys window to complete the process.
Configure your dropbox
After your partner representative creates your dropbox, you need to configure the defaults for your account.
To configure your dropbox:
- Sign in to the Dashboard for your YouTube content owner.
- Click Dropbox account in the Content Delivery box.

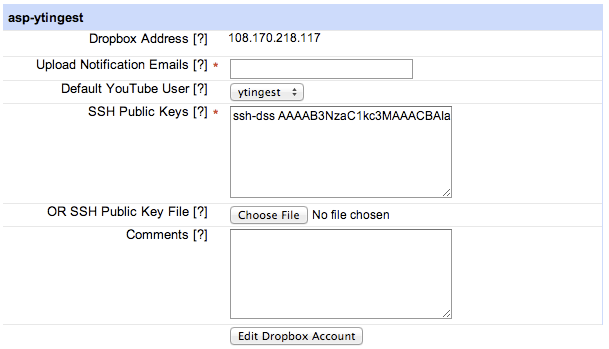
- Record the name and address of the dropbox.You’ll need this information to connect to the dropbox.
The blue bar shows the name. For Aspera dropboxes, the name starts with asp-; for SFTP dropboxes, the name starts with yt-. The address for an Aspera dropbox is shown as the Dropbox Address; the address for an SFTP dropbox is
partnerupload.google.com.Accounts with numerous content owners may have more than one dropbox. Make sure you record the information for your dropbox. - Confirm that the Default YouTube User and SSH Public Keys are correct.The default YouTube user identifies the account (channel) that will be designated as the owner of your uploaded videos if the content feed doesn’t specify a different owner.
The SSH Public Keys box should contain the SSH key you provided to your partner representative. Be sure that the key includes your email address at the end.
- In the Upload Notification Emails text box, enter one or more email addresses where you want YouTube to send status reports.Separate multiple email addresses with a space.
- Click Edit Dropbox Account to save your changes.
Please note that a dropbox is per content owner and not channel. In other words, you can upload to several different channels using just one dropbox.
Connect to your Aspera dropbox
Once you’ve configured your dropbox, you need to create a reusable connection between your Aspera client and your dropbox.
Make sure you have the dropbox name and IP address on hand for easy reference; you can find this information on theDropbox Account settings page in the YouTube Content Manager.
To create an Aspera connection:
- Open your Aspera client.
- Click the Connections icon to open the Connection Manager.
- Click + to create a new connection.

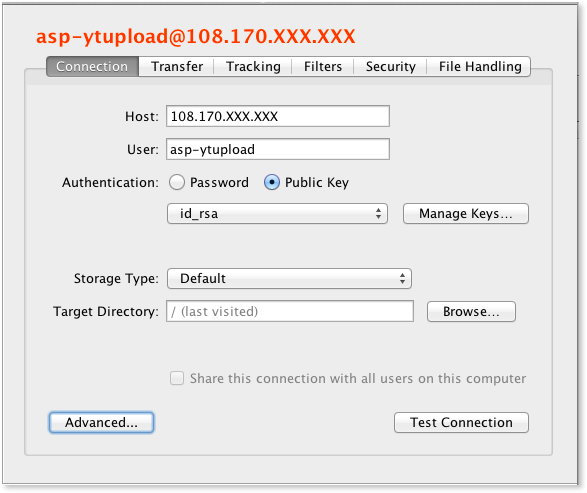
- Enter the IP address for your dropbox into the Host text box.
- Enter the dropbox name in the User text box.
- Select Public Key as the authentication option, then choose the key for this dropbox from the list of available keys.
- Click the Advanced btn to display the Advanced Connection Settings.
- Change the value for SSH Port (TCP) to 33001.
- Click OK twice to save your changes and return to the main Aspera client screen.Your new connection appears on the right side of the screen.
Upload content to your Aspera dropbox
After validating the metadata for an upload batch, you’re ready to upload the files. You upload content by copying the necessary files into your dropbox, then letting us know that they are ready by creating a file named delivery.complete.
Which files you need to complete an upload depends on which asset type you’re uploading. Every upload job must include a metadata file in XML or CSV format and any new media files that the metadata file references by name.
We recommend uploading new assets one at a time, each with its own dropbox folder and metadata file. For example, if you’re uploading three episodes of a TV program, create three separate folders and three separate metadata files. This approach makes it easier to track the progress of the upload and limits the impact of any issues that occur, without any impact on the upload processing speed.
(Other recommended best practices)
To upload content to your Aspera dropbox:
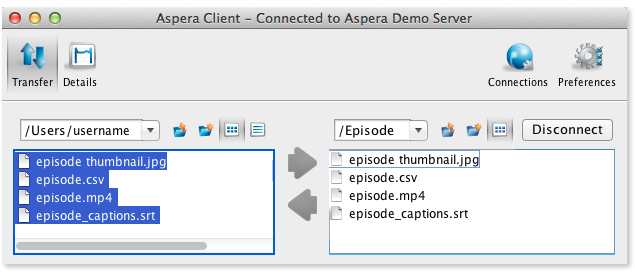
- Open your Aspera client.
- Select the connection for your dropbox in the Connection box on the right, then click the Connect btn.The Aspera client connects to your dropbox and displays the top-level folders.
If you haven’t set up a connection for your dropbox yet, see Connecting to your Aspera dropbox.
- Create a new folder for the new upload job.To create a folder, right-click on the parent folder and select New > Folder. To avoid possible conflicts, we recommend that you create a new directory each time you post content and that you include a timestamp or incremental ID in each directory’s name.
- Copy all of the files for the upload package into the new folder.To copy files into a folder, make sure the intended folder is open on the right, highlight the files in the box on the left, and click the right-facing arrow.

- When all files are copied, upload the delivery.complete file to the same folder.
After processing each upload batch, the upload engine posts a status report detailing the actions taken for each item in the batch. The report is named status-xml-filename, where xml-filename is the filename of your metadata file. The status report is placed in your dropbox in the same directory as the upload batch.
The time needed to process an upload batch and generate a status report varies depending on system load and the actions requested. For example, the system requires much less time to process updates to an asset’s metadata than to process new reference files. The upload engine will also spend additional processing time on batches that generate failed actions, because the system retries certain failed actions to ensure that failures were not caused by transient conditions such as system downtime. In some cases, we may require more than one day to process an upload batch.
Aspera dropbox upload best practices
Please follow these guidelines for uploading content (metadata and reference files) to Google.
Create a unique folder for each upload batch
All files that you post to your dropbox must be in a folder. Google ignores files in the root folder of the dropbox, including any delivery.complete files.
To avoid possible naming conflicts, we recommend that you create a new folder each time you post content and that you include a timestamp or incremental ID in each folder’s name. The timestamp or ID provides a good way to track the upload batches.
Use smaller batches
Create multiple smaller batches rather than a single larger batch. We generally recommend uploading the files for one asset at a time. If you’re using a dropbox, create a separate directory — and separate delivery.complete file — for each asset.
It doesn’t take any longer to process 10 batches containing one asset each than one batch containing 10 assets. The processing of each individual batch is faster, though, and any failed uploads affect only the problematic asset.
The recommended maximum size for an upload batch is 100 assets. The metadata file (CSV or XML) cannot exceed 10MB.
Include all referenced files
Make sure that the file names referenced in the metadata CSV or XML file match the actual files you’re uploading, including their file extensions. The upload will fail if the names don’t match or if a referenced file is missing.
Remove the folders for successfully uploaded batches from your dropbox
Your dropbox is a temporary staging area for uploading content. It is not intended for long-term storage. We automatically remove files that have been in your dropbox for more than 45 days. We recommend deleting the folders and status files for successfully uploaded batches.
The failed_packages subdirectory of the dropbox account contains files that we were unable to upload successfully. Review the files to correct the issues that prevented proper uploading, then move them to the folder for a new upload batch. We will process the files again when you add the delivery.complete file to the folder.
Review upload status
Use the Upload Status – List View page to monitor the status of jobs in progress or to confirm that a job has finished processing.
To review the status of an upload batch:
- Sign in to the YouTube Dashboard.
- Select Upload Status > List View from the Content Delivery box.
- Select All in the Job Status drop-down box.
- Click Show Jobs.
- Select the Job ID of the upload batch whose status you want to review.
- Click Status File.
- Search for “fail” to locate status updates reporting problems.
Diagnose upload issues with an Aspera dropbox
Are you having trouble uploading content to YouTube using your Aspera dropbox? Answer the following questions to help identify and resolve the problem.
For more information on Multi Channel Network’s and YouTube how to videos please check back weekly or subscribe here.