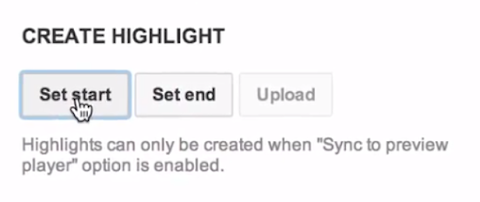
Create highlight clips
Watch the video demo
- Create your Event and start streaming with the sync to preview feature enabled.
Note: Archive recording does not need to be enabled in order to create highlights.
- Using the Preview Player timeline, mark the in and out points using the Create Highlight Set Start and Set End btns.

- Click Upload to process a highlight clip. Multiple highlight clips can be created during an event.
- The processing files can be seen in the Video Manager —> Uploads section. Metadata and custom thumbnails can be added at any time.
Re-using entrypoints (streams)
Create custom ingestion settings by using the “Custom ingestion” dropdown menu under Ingestion Settings. You can use those ingestion settings for multiple events again and again.
For example, you can create one stream called “720p Gaming” and use those entrypoints for all of your 720p gaming events. Or, if you have multiple encoders, you can create a stream called “Encoder A, 720p” and use those entrypoints for all of the 720p events you do on that encoder.
For testing, you can create a test event and a live event associated with the same source stream. That way, you don’t have to reconfigure your encoder between testing and your live event.
Just be sure that you don’t encode to the same entrypoints simultaneously on multiple encoders.
Slate and ad insertion
Ad insertion:
If you are setup for Monetization on YouTube, you will also be able to allow Instream ads on live events. To learn more about YouTube Monetization, please review the Monetization Basics & Policies section of the Help Center.In a live event, it is important that ad breaks have a predetermined length. Only stream cleared content or a slate during the ad break, in case ad inventory is not available.
- In Video Manager, under Live Events, click on Edit and select Monetization from the drop down.
- Or, when creating the event, go to the “Monetization” tab at the top next to “Basic Info.”
- Select “Claim this video”
- Select “Apply usage policy” and choose the appropriate monetization policy for your video.
- Click Save
Pre-roll ads play each time the player is loaded.
Slate insertion:
The slate (static YouTube log) feature allows you to cover the video being fed by your encoder.
- Review the stream using the Preview Player under the Manage tab.
- Click the Slate In btn to insert a slate into the public stream. To remove the slate, click Slate Out.
*The ads and slate will appear in the Public View player only. Remember to slate out in the Manage tab and confirm the slate has been removed in the Public View player.
- Enable Sync to Preview option when starting the stream from the Live Control Room.
- Review the stream using the Preview Player under the Manage tab.
- Click the Insert Ad btn to deliver an ad cue into the stream.
Live chat
Live chat is enabled by default. To disable live chat, navigate to Edit> Basic Info> Advanced Settings for your scheduled event in Video Manager. Under Chat, uncheck “Enable live chat.” You can disable live chat at any time, even after the event has started.
Enable live chat
- The live chat module will appear to the right of the video player only when your event is active.
- Live chat module only exists on the YouTube watch pages. It does not follow embedded players.
- YouTube Analytics “Comments” metric is for the live event and VOD archive version.
Post-event Comments
- Live Chat will no longer be available after the event has ended.
- Post-live comments will appear below the player after the event.
Live chat moderation
We strongly recommend that you have a dedicated live chat moderator for high-traffic events. The channel admin can delete chat line items as they are posted or block users from chatting.
- From the Edit> Basic Info> Advanced Settings tab select the “Automatically block spam messages.” checkbox. This will block simple spam such as long messages in all caps or repeated identical messages by the same user.
- Proactively compile blacklisted words in the Community Settings section. Live chats matching these words will be blocked.
- Assign moderators by clicking the three dots (…) next to the chat text box. Moderators can flag and block abusers from live chat.
- Users are limited to 200 characters and a maximum of 3 submissions every 30 seconds. Event owners are not subject to the frequency threshold.
- Users cannot post special characters, URLs or HTML tags.
Promoting your event
When promoting the event, be sure to do the following.
Before the Event:
- Schedule your event at least 48 hours before going live.
- When creating the Live Event ID, select “Promote through featured content…” in the Advanced Settings tab. This will feature the Public live event across all your channel videos.
- Link your Google+, Facebook and Twitter accounts to your channel by going to My Channel, clicking the “Edit links” btn next to the channel art section.
- From the Basic Info tab, create a custom post for your subscribers and social media sites. The message will post alongside the event link, when the Public event is set live.
- Allow embedding on Advanced Settings tab, so others can distribute for you. Use the embed URL to display the event on your website. Send the links to blogs which may want to display your content.
- Create a Google + event and invite your circles to view the live stream. The event link can be added under the Advanced Settings.
- Direct users to youtube.com/user/[channelname]/live. If, for any reason, you need to create a new live event ID, this link will load the most recently started event without affecting your marketing.
- Create a Live Section to display upcoming and live events on your channel.
- Associate your channel with your website under Account Settings →Channel Settings → Advanced → Associated Website. This will help us improve the quality of our search results and verify your channel as the official representation of your brand on YouTube.
- Apply optimization techniques to your channel and videos.
- Create a channel trailer or teaser video to promote the event.
During the Event:
- Feature the event on your channel.
- Subscribers will be notified of Public events that you create in their homepage feed.
- Subscribers will see the live stream appear in the What to Watch Next area.
- You can also update the channel art to include the event name, date and time.
After the Event:
- Post an archive of the live event soon after the completion.
- Create clips of the event using the local archive, upload and organize into playlists.
Setup multi-camera events
You may want to offer additional camera angles for your live event. This is useful if you would like to offer your viewers multiple angles of a live event.
Adding an additional camera
- Create your event as you normally would.
- On the Ingestion Settings tab, click Add a Camera. (You can add up to 6).
- Add a unique thumbnail and title for your camera.
You can create a custom camera name for your main camera by clicking back on the Main Camera tab. - Click Save.
**Note the standard player has an additional 50 pixels at the top for thumbnails. These allow users to navigate to each unique camera.
Monitoring your Multi-Cam Event
During the event, the metrics for the overall event and individual camera angles can be monitored from the Live Control Room. Use the Camera Angle filter to see the metrics for each camera.

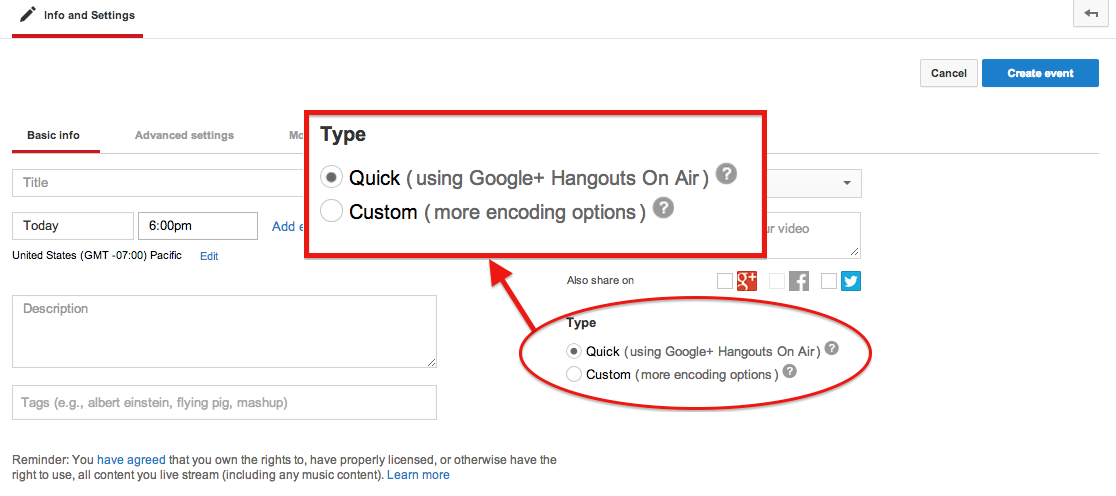
Quick vs Custom Live Event Types
Google+ Hangouts on Air from your YouTube channel
There are two different types of live events that you can create from YouTube. Quick will create a Google+ Hangout on Air with all of the standard HOA features including quick-start streaming right from your laptop. Custom will create aYouTube Live Event where you control your event production and manage your own encoding settings using your preferred platform.
Feature Comparison
| Quick (G+ Hangouts on Air) |
Custom (YouTube Live) |
|
|---|---|---|
| Setup | ||
| No separate encoding equipment needed. Stream right from your browser. | X (Requirements) |
|
| Use your own preferred encoding equipment and customize your encoding settings. Optional reusable entrypoints for encoders. | X | |
| Send your highest quality, we’ll automatically create all lower qualities for the viewers. | X | X |
| Ingestion bitrate and resolutions automatically created, based on your network conditions. Up to 720p. | X | |
| Choose your own ingestion bitrate and resolution, based on your network conditions. Up to 1080p. | X | |
| Send redundant streams for automatic seamless failover if needed. | X | |
| A/V Options | ||
| Completely control your production, using whatever audiovisual equipment you prefer. You control the source and the encoding. | X | |
| Choose a single audio and video input. Use Hangout Toolbox and Google Effects to add lower thirds and other effects. | X | |
| Features | ||
| Enable monetization with pre-roll ads. | X | X |
| Insert mid-roll ads from the Live Control Room. | X | |
| Player branded with Google+ watermark. | X | |
| Player automatically chooses the best playback quality for the viewer as the default. Users can also manually choose a quality to watch. | X | X |
| Upload a custom thumbnail for the live event. | X | |
| Unlimited event durations. | 8-hour limit | X |
| Create multicam events. | X | |
| Automatically record the event (max 4 hours) and use YouTube Video Editor to edit the recording (max 2 hours). | X | X |
| Enable DVR for users to rewind the most recent 4 hours of your event. | X | X |
| Start and stop the event from the Live Events Video Manager. | X | |
| Start and stop the event from the Live Control Room. | X | |
| Insert Broadcast Alerts, Slates, and Create Highlights from the Live Control Room during the live event. | X | |
| Monitor analytics and stream health from the Live Control Room during the live event. | X | X |
| Create Unlisted and Private events. | X | X |
| Interactivity | ||
| Use YouTube comments to interact with viewers. Assign moderators to manage comments. | X | X |
| Invite Google+ users to participate in the event via video. (Max 10 guests) Moderate participants with Hangout tools. | X | |
| Promotion Tools | ||
| Manually create a Google+ Event and add the live event. | X | X |
| Share the live event with your YouTube, Google+, Facebook, and Twitter followers. | X | X |
Cards on live streams
Cards allow you to add a new layer of interactivity to your videos. They are applied on a per video basis and are rendered on desktop and mobile devices. You can provide a destination URL from a list of eligible sites and, depending on the card type, customize an image, title, and call-to-action text. Navigate to the Cards tab in the Live Event to get started.
For Live Fan Funding:
- Enable your channel for Fan Funding. Be sure to accept the YouTube Fan Support Program Agreement.
- From your live stream, navigate to the “Cards” tab and select the Fan Funding card.

- Click on Add Card and select Fan Funding.
- Direct viewers to click on the [i] to reveal the card. Viewers can select an amount and leave a comment.
- Creators can see tips as they come in on the Live Control Room.


Currently available in:
- Australia (AU)
- Japan (JP)
- Mexico (MX)
- United States (US)
If you have questions about Fan Funding, click here.
Live events on paid channels
As long as your account is eligible and enabled for live streaming, you must claim the live event in order to make it paid.
For more information on paid channels click here.
Live caption requirements
Closed captions refer to the visual display of the audio in a program. In order to live caption your event, you need to send captions to YouTube from a supported software through HTTP POSTs.
For live events that appear on US television with captions, captions may be required online as well. You may wish to review the FCC’s information on this here: http://www.fcc.gov/guides/captioning-internet-video-programming
Enabling Closed Captions on a Live Stream
(Requires working with one of our supported software, listed below)
- Create your event as you normally would. You must be using the New YouTube Live platform.
- At the bottom of the Ingestion Settings tab, there is a Closed Caption section. Check the box for Enable captions (requires supported software).
- Click in the Caption Ingestion URL box to select all and copy it. This is a signed HTTP URL.
Each stream entry point can have one caption feed only.
- Provide this URL to your captioner to enter in their YouTube-supported caption software.
- Hit Save.
Supported Software
- Total Eclipse
- You will need Eclipse/AccuCap 6.0.0.5 or greater in order to use this feature.
- Contact tech support (su*****@********at.com or 1-800-800-1759) for installation and usage instructions.
- Case CATalyst
- You will need Case CATalyst BCS version 14.52 or greater in order to use this feature.
- Contact tech support (1-800-323-4247 or 630-532-5100) for installation and usage instructions.
- Caption Maker
- You will need CaptionMaker version 5.22 or later to use this feature.
- Contact tech support for installation and usage instructions.
- StreamText.Net
- Cloud based caption delivery system that is compatible with all speech to text platforms.
- Please contact support su*****@********xt.net for instructions.
If you are a closed caption vendor and would like to learn more about YouTube closed captions over HTTP, fill out this form