Upload videos
You can upload videos to YouTube in a few easy steps. Below you can find the necessary instructions to upload your videos from a computer or from a mobile device.
To get started uploading videos on YouTube from your desktop, follow the steps below:
- Sign into YouTube.
- Click the Upload btn at the top of the page.
- Before you start uploading the video you can chose the video privacy settings.
- Select the video you’d like to upload from your computer. You can also record a video from your webcam, create a video slideshow or import a video from Google+.
- As the video is uploading you can edit both the basic information and the advanced settings of the video, and decide if you want to notify subscribers (if you untick this option no communication will be shared with your subscribers). Partners will also be able to adjust their Monetization settings.
- Click Publish to finish uploading a public video to YouTube. If you set the video privacy setting to Private or Unlisted, just click Done to finish the upload or click Share to privately share your video.
- If you haven’t clicked Publish, your video won’t be viewable by other people. You can always publish your video at a later time in your Video Manager.
Once the upload is completed we will send you an email to notify you that your video is done uploading and processing. You can then forward that email to friends or family for easy sharing. If you prefer not to receive notification, you can opt out by visiting your email settings.
The easiest way to upload videos from an Android device is to use the YouTube app.
- Sign in to YouTube.
- Open the Guide
 in the upper left corner of the screen and navigate to Uploads.
 - Touch the Upload icon
 at the top of the screen.
 - Select the video you want to upload.
- Adjust the title, description, tags and privacy settings of your video.
- On supported devices, you’ll also see a video preview with trim handles below it. Drag the trim handles to edit your video’s length. A long press on the trim handle will allow you to zoom into a frame by frame view for exact trimming.
- Touch the Upload icon.
Tip: Go to Settings > Uploads to modify the type of connection used to upload videos. Use this setting to restrict uploads to Wi-Fi only.
You can upload videos from your iOS device directly from the YouTube app. Make sure you have the latest version of the YouTube iOS app installed. Follow the steps below:
- Sign in to YouTube.
- Open the Guide in the upper left corner of the screen and navigate to My Channel (or directly touch theUpload icon on the guide.)
- Touch the Upload icon at the top of the screen
- Select the video you want to upload from your Camera roll and touch the confirmation btn.
- Adjust the title, description, tags and privacy settings of your video.
- Touch the Upload icon
 .
.
 .
.Tip: Go to Settings > Uploads to modify the type of connection used to upload videos. Use this setting to restrict uploads to Wi-Fi only.
You can also upload videos to YouTube from the YouTube Capture app or directly from the iOS Photos app. For more information about using YouTube Capture, visit the YouTube Capture help topic.
If you’re having trouble signing in, make sure you’re using the email address associated with your YouTube account.
If you recently connected your channel with a Google+ page, learn how to upload videos to your channel.
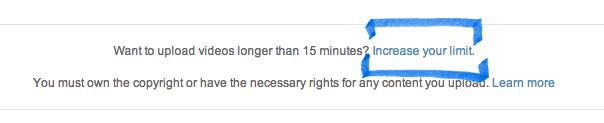
Upload videos longer than 15 minutes
By default, you can upload videos that are up to 15 minutes long. To upload longer videos, verify your account with the following steps.
- On a computer, visit the upload page at www.youtube.com/my_videos_upload
- Click Increase your limit at the bottom of the page, or visit https://www.youtube.com/verify
- Follow the steps to verify your account with a phone. You can choose between receiving the verification code through a text message (on a mobile phone) or an automated voice call.
 Make sure you’re using an up-to-date version of your browser so you can upload files greater than 20GB. The maximum file size you’ll be able to upload to YouTube is 128GB and the maximum duration is 11 hours.
If you forgot to verify your account before uploading your long video, you’ll be prompted to do so after your video has finished processing. You may also see a “Rejected (length of video too long)” error in your Video Manager. (Here, click the Verify account btn next to the video.)
Once you’ve verified your account, click Activate this video in your Video Manager to publish it. Activated videos are automatically set as private videos, so make sure to check the privacy settings for your video and edit them if you’d like.
If you can’t find the link described above, it’s possible that you may already be able to upload long videos. Check the “Longer videos” section in your Account Features page to check if the feature’s already enabled.
If you used to be able to upload long videos and no longer can, check your account for copyright claims and strikes.
You’ll only be able to upload long videos if your account is in good standing based on YouTube Community Guidelines and there aren’t any worldwide Content ID blocks on your content.
If your video is larger than 128GB, try compressing your video in a video editor before uploading it to YouTube. This will reduce your video file size, while still keeping the video quality high. One common way to compress a video for YouTube is to encode it using the H.264 codec.
Set default upload settings
- Go to your Video Manager
- In the menu on the left side of the page, click Channel Settings, then Defaults
- Use the defaults menu to set your defaults. Options that can be defaulted are privacy, category, title, license, tags, suggested edits, and more
- Click Save
Now when you upload a video, you’ll see the default fields pre-set according to your choices.
You’ll still be able to change settings after you upload.
Default upload settings will only affect videos uploaded through your web browser (youtube.com/upload). If you upload videos through mobile, Hangout On Air, or video editor, they won’t respect these default settings.
Upload audio or image files
Convert audio and image files into a format that will work on YouTube
Want to upload a song you wrote or a slideshow of photos from your vacation?
Since YouTube’s not designed to host files that are exclusively audio (.MP3, .WAV, etc.) or files that are exclusively images (.JPG, .PNG, etc.), before you upload, you’ll need to combine audio and image files into a format that will work on YouTube.
Convert an audio file
You can use free programs like Windows Live Movie Maker to add an image to an audio track so you can convert it into a .WMV video file. After you’ve converted the file, you can then upload it to YouTube.
Here’s how you convert audio tracks into .WMV video files on Windows Live Movie Maker:
Part 1: Select your audio and image files
- Select Add videos and Photos from the bar at the top, then choose an image from your computer. This image will be displayed in your slideshow.
- Click Add music and select your audio track.
Part 2: Adjust the image to fit the audio track
To make sure the file is properly uploaded on YouTube, you’ll need to adjust the duration of the image to match the duration of the audio track on your timeline.
- Double click the green audio bar in the timeline, which will display “End point”. Copy the End point number (e.g. 261.49).
- Double click the image thumbnail in the timeline, and enter a duration equal to the length of the audio track. For example, if the audio track has a length of 261.49 the image duration should be adjusted to 261.49 as well.
Part 3: Save your file
- Choose Recommended for this project.
- After naming your movie, click Save.
You can use a program like iMovie to add an image to an audio track so you can convert it into a .MOV video file. After you’ve converted the file, you can then upload it to YouTube.
Here’s how you convert audio tracks into .MOV video files on iMovie:
Part 1: Add an image and audio file
- Drag an image file from your computer into the project area.
- Drag the audio file into the project area
Part 2: Adjust the image to fit the audio track
To make sure the file is properly uploaded on YouTube, you’ll need to adjust the duration of the image to match the duration of the audio track on your timeline.
- Click the gear menu in the green box
- Click Clip Adjustments and copy the numbers under “Source Duration”. This is the length of your audio track.
- Next, hover your mouse over the thumbnail of the image, and click the gear that appears (not the gear in the green box)
- Select Clip Adjustments
- Enter the numbers from the “Source Duration” in Step 2 into the “Duration” field.
- Click Done
Part 3: Save your file
- Click the Share menu
- Select Export using QuickTime…
- Name your file and click Save
Convert image files into a slideshow
Here’s how you can easily convert photos into a slideshow:
- Visit the upload page on YouTube
- Click Create under Photo slideshow.

- Upload photos from your computer, or select photos from an existing Google+ photo album, and click Select
- Drag and drop the photos to rearrange them. When you’re done, click Next
- Select an audio track from the library under “Audio”, or select No audio to have your slideshow play without music. (You won’t be able to upload audio files from your computer).
- Click Upload when you’ve finished making your slideshow

You can also use a programs like Windows Live Movie Maker or iMovie to add audio to your images before uploading the file to YouTube.
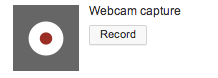
Use webcam to record video
If you have a webcam built into or connected to your computer, you can record a webcam video on YouTube and upload it directly to the site.
How to record your video
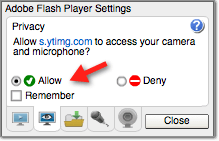
Click the Record from webcam link on the upload page, or simply go to http://www.youtube.com/my_webcam to get started.
Select Allow if you’re asked to permit YouTube to access your camera and microphone.
Preview and publish your video
After you’ve recorded the video, you can preview it by clicking the Play btn.
Not happy with the video? No problem! Just click the Start over btn below the video. When you’re satisfied with the video, click the Upload btn.
Formatting tags
Tags are descriptive keywords you can add to your video to help people find your content. However, you can also add tags to change the appearance and format of your video on YouTube and on embedded players.
Examples of formatting tags
- yt:quality=high: Defaults to a high quality stream (available based on the size of the viewer’s player and the size of the browser window)
- yt:crop=16:9: Zooms in on the 16:9 area, removes windowboxing
- yt:stretch=16:9: Fixes anamorphic content by scaling to 16:9
- yt:stretch=4:3: Fixes 720×480 content that is the wrong aspect ratio by scaling to 4:3
- yt:crop=off: Deactivates cropping effects on the video and reestablishes cropped areas
How to add tags:
While you’re uploading, you’ll see a “Tags” section below the upload progress bar where you can add your tags.
To add tags to an existing video, visit your Video Manager, then click the Edit btn below the video for which you’d like to add formatting tags.
Upload a video on Xbox One
You can upload videos to YouTube directly from your Xbox One. Here’s how:
- Sign in to the YouTube app
- Navigate to Uploads and select the Upload tile. If you don’t see the Upload tile, you may need to change the “Share on social networks” setting to Allowed on your Xbox account.
- You’ll now see the videos you’ve recorded on your Xbox One. Choose the video you’d like to upload.
- Enter a title, choose the privacy setting for your video, and make sure that you’re uploading to the correct channel. If you don’t see the correct channel, sign out of the YouTube app and sign in with the desired channel.
- Select Upload and your video will begin uploading. Make sure to stay on the upload screen until your video is fully uploaded as minimizing or leaving the app may cause the upload to fail.
It may take a few minutes for your video to be displayed in your Uploads row. Once your video is displayed, you can edit the title and privacy settings. You can also delete the video from YouTube. Note: This will not delete your video from your Xbox One device.
Import videos from Google+

Once you’ve chosen one or several videos click Select and the import process will start. Then you’ll be able to change the title, add a description or modify the privacy settings of the video among other settings. Once you are done editing your video settings and information click Publish for public videos or Done/Share for private videos and unlisted videos.
It is important to know which Google+ identity is linked to your channel. If you believe that your channel is connected to the wrong Google+ page or profile, look for help here.
Upload 360 degree videos
YouTube supports uploading and playback of 360 degree spherical videos on desktop Chrome. In order to upload a 360 degree video file, you’ll need to modify the file with an app or script before uploading.
You can also watch 360 degree videos on YouTube apps for Android and iOS. For an immersive experience, you can even watch 360 degree videos with Cardboard and the YouTube Android app.
Create the video
The following 360 cameras are compatible with YouTube and are available today or coming soon:
For the best results, encode your video at a high resolution and according to YouTube’s advanced specifications. YouTube currently supports 360 degree videos with 24, 25 or 30 frames per second. Support for higher frame rates is coming soon.
Apart from the above mentioned cameras, 360 degree videos can also be created using custom camera rigs and third party stitching software like Kolor Autopano.
Prepare for upload
Your video file needs to include certain metadata for 360 degree playback to be enabled. Follow these instructions to install an app that will add the necessary metadata into a new file for you.
Create a 360-enabled file with an app
- Download the 360 Video Metadata app for Mac or Windows
- Un-zip the file, then open the 360 Video Metadata app. If you’re on a Mac, you may need to right-click the app and then click “Open”
- Select the video file
- Click “Inject and save”
- Enter a name for the file that will be created
- Save the file. A new file will be created automatically in the same location as the original file
- Upload the new file to YouTube
- Wait for the 360 degree effect to process. This may take up to an hour.
You can also add the metadata using a Python script.
Upload the file
Before publishing, you can verify that the file has 360 degree playback enabled by checking the video by watching it on your computer. It may take up to an hour for 360 degree playback to be available.
360 degree videos feature a pan btn in the top left, and can be rotated using the WASD keys, so look for these features to confirm your video is in 360.
Be sure not to make edits to the video itself using the YouTube Video Editor and Enhancements tools on desktop or mobile apps, as these tools don’t currently support 360 degree videos.
Supported YouTube file formats
Not sure which format to save your video? Receiving an “invalid file format error message when you’re uploading”?
Make sure that you’re using one of the following formats:
- .MOV
- .MPEG4
- MP4
- .AVI
- .WMV
- .MPEGPS
- .FLV
- 3GPP
- WebM
For more advanced information on file formats you can read through this article on encoding settings.