Introduction to paid content
YouTube paid content is video or channel content that only paying customers can see. A paid video is a video for which users pay a rental or purchase fee to watch the video. A paid channel is a channel for which users pay a monthly or yearly subscription fee to watch its videos. As the channel owner, you define one or more offers that set the terms of the rental, purchase, or subscription.
When a user rents or purchases a paid video or subscribes to a paid channel, he or she selects an offer and goes through the standard YouTube purchase process. The user gets access to the paid content as soon as the purchase is complete. All subscriptions include a 14-day free trial, so the user’s credit card is not charged until the end of the free trial. If the user unsubscribes during the free trial, the credit card is not charged.
Users purchase paid content on the web at youtube.com or on Android devices with the supported YouTube app, and then can view the content on various platforms and devices.
To create paid content:
- Enable paid content for your YouTube account.
- Upload content to your channel.
- Create rental and/or purchase offers for the video, or subscription offers for the channel.
Revenue from paid videos appears in the Transactional reports section of the Content Manager, on the Paid Subscriptions and account monetization pages, and in the Transaction earnings report in YouTube Analytics. Paid channel revenue does not appear in YouTube Analytics at this time.
Enable paid content
Before you can make your videos or channels paid, you need to enable paid content for your YouTube account.
To enable paid content for your account:
- On the Account Features page for your channel, locate the Paid content option.This option is available only if you meet the eligibility requirements detailed below.
If the Paid content option indicates that your network needs to sign an agreement with YouTube, someone withContent Manager permissions needs to go to the Settings > Features page, click Enable, and sign the agreement. You can skip the remaining steps.
- Click the Enable btn.
- Read the terms of the YouTube Paid Content Agreement, select the check boxes indicating that you agree to the terms, and click I accept.A Paid Subscriptions option appears in the list of Channel Settings on the left of the screen, and a Require purchase or rental to view checkbox appears on the Monetization tab of the video editor.
Eligibility requirements
To be eligible to create paid content, you must meet these requirements:
- Your account is in good standing.
- You meet the general criteria for YouTube partnership.
- You have verified your account by phone.
- You have an approved AdSense account linked to your YouTube account.
- You own a channel with at least 1000 active subscribers.
- You are located in one of these countries:
- Australia (AU)
- Brazil (BR)
- Canada (CA)
- France (FR)
- Hong Kong (HK)
- India (IN)
- Italy (IT)
- Japan (JP)
- Mexico (MX)
- New Zealand (NZ)
- Philippines (PH)
- South Korea (KR)
- Spain (ES)
- Uganda (UG)
- United Kingdom (GB)
- United States (US)
Upload paid content
You upload paid content in the same way you upload content to any channel. However, paid content needs to meet the additional requirements described below. Expand any of the items below to learn more about the requirement.
A paid channel can include both paid videos, which only paid subscribers can view, and free videos, which both subscribers and non-subscribers can view.
You set the default value for uploaded videos on the channel’s Upload Defaults page. To upload most content as paid videos, select the Require paid subscription to view check box; to upload free videos by default, deselect the check box.
You can change the free or paid status for an individual video in the Video Manager. The Require paid subscription to view check box is on the video’s Monetization page. You can also specify a video’s free or paid status when you upload it using the YouTube Rights Feed XML format or a spreadsheet template.
Every paid video must be approved for monetization. If you go through a standard review process, the video is unavailable until the review process is complete. If you have the option to set a policy directly, you must set it, with no ownership conflicts. If an ownership conflict occurs with a paid video then the video will be blocked and unavailable to subscribers until the ownership conflict is resolved with the conflicting content owner.
All paid videos uploaded to a paid channel must have a content rating for each country in which it is available. Paid videos without a rating will be restricted to users over the age of 18 and labeled with the messaging of “may contain content intended for mature audiences.”
You can rate videos using a YouTube content rating or, if required by law, an official rating from a ratings organization.
If you upload a video using the YouTube Rights Feed XML format or a spreadsheet template, you can apply a YouTube content rating or an official rating to it at upload time. You can also apply ratings in the Video Manager.
The specific requirements depend on the country in which the video is available.
- In Brazil, France, and Spain, videos must be available in the local language.
- In Japan and Korea, the channel description must explicitly note if videos are not available in the local language. This approach is a best practice for all countries.
Create paid videos
Once you have enabled your YouTube account for paid content, you can require users to pay to view videos you upload. You can create a new paid video or convert an existing free video to require payment for viewing.
To create a new paid video:
- Upload content to your channel.
- While editing the video go to the Monetization section and click Require purchase or rental to view.
- Create video rental or purchase offers.
To convert an existing free video to require payment for viewing:
- While editing the video go to the Monetization section and click Require purchase or rental to view.
- Create video rental or purchase offers.
Paid videos can also be enabled for embedding and embedded on other websites. Embedded paid videos still require payment before the customer can view the video.
Create paid channels
Once you have enabled your YouTube account for paid content, you can require users to pay to view the content for one or more of your channels. Only paying customers can view the video or channel content, except for specific videos you decide to make available to everyone for free. You can create a new channel for your paid content (recommended) or convert an existing free channel to require paid subscriptions.
To create a new paid channel:
- Go to the Paid Subscriptions page for one of your existing channels.
- Click the Create new paid channel btn.Creating the channel from this page lets YouTube know that the new channel is eligible for paid subscriptions.
Certain partners don’t have the Create new paid channel btn. If you don’t see the btn, follow these steps to create the new channel:
- Go to the channel switcher page and click Create a new channel.
- Go to the Channels page and invite the new channel to join your content owner account.
- Click the gear icon for the new channel and select Paid Subscription from the menu.
- Make the new channel paid by clicking Make this channel paid.
- Fill out the details to create your new channel.
- Create subscription offers for the channel.
To convert a free channel to a paid channel:
- Go to the Paid Subscriptions page for the existing free channel.This page is part of the Channel Settings.
- Click Make this channel paid.
- Create subscription offers for the channel.
For paid channels, it is especially important to describe for potential subscribers the nature of the channel’s content. If your channel contains any content that is inappropriate for minors, make this fact clear in the channel description (“This channel contains content intended for mature audiences. It is not recommended for viewers under the age of 18.”). For channels available in multiple countries, specify which languages the content is available in (“Some or all of the content on this channel is only available in English.”).
To attract as many subscribers as possible, you should optimize the channel by following the recommendations in theYouTube Creator Playbook.
Create channel subscription offers
To subscribe to a paid channel, a user chooses an offer. The offer determines the terms of the subscription: how much it costs, how frequently the user is charged, and which country it is available in. You must define one or more offers before users can subscribe to your paid channel.
To create an offer:
- Go to the Paid Subscriptions page for the channel.If you haven’t yet enabled paid content or configured the channel as a paid channel, you’ll need to complete those actions first.
- Click Create new offer.

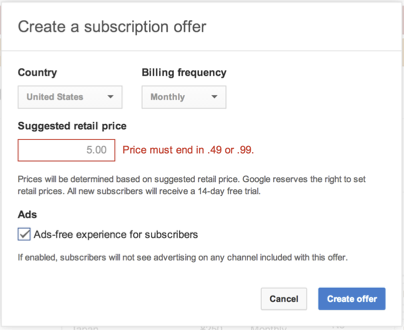
- Select the Country in which this offer is valid.To make a similar offer available in multiple countries, you must create the offer separately for each country.
- Select the Billing frequency for the offer.You can charge users Monthly or Yearly.
- Set the Suggested retail price for the offer.The subscription price will be determined based on the suggested retail price. Google reserves the right to set the retail price. All new subscribers will receive a 14-day free trial.
The available prices are in the currency of the selected country. The retail price must meet the requirements for that country.
Country Valid retail prices United States $0.49 to $299.99, ending in .49 or .99 Australia $0.49 to $399.99, ending in .49 or .99 Argentina $9.90 to $2999.90, ending in 9.90 Brazil R$0.90 to R$700.90, ending in .90 Bosnia and Herzegovina 1 BAM to 500 BAM Canada $0.49 to $299.99, ending in .49 or .99 Chile $90 to $199990, ending in 90 Colombia $900 to $699900, ending in 000 or 900 EUR countries
(Austria, Belgium, Finland, France, Greece,
Ireland, Italy, Netherlands, Portugal,
Slovenia, Slovakia, Spain)€0.49 to €299.99, ending in .49 or .99 Hong Kong HK$8 to HK$8888, ending in 8 Hungary 100 HUF to 8000 HUF India ₹5 to ₹20000, in multiples of 5 Japan ¥100 to ¥30000, in multiples of 100 Macedonia 40 MKD to 14000 MKD Mexico $9 to $3999, ending in 9 New Zealand $0.95 to $399.95, ending in .95 Peru PEN 3.00 to PEN 899.00, ending in .00 Philippines ₱10 to ₱20,000, in multiples of 10 Poland zł5.00 to zł999.00, ending in 5 or 9 Scandinavia
(Denmark, Norway, Sweden)9 kr. to 1999 kr., ending in 9 Senegal 10 CFA to 200000 CFA, in multiples of 10 South Korea ₩100 to ₩350000, in multiples of 100 Switzerland CHF .90 to CHF 299.90, ending in .90 Taiwan $9 to $9,999, ending in 0 or 9 Uganda UGX 1,000 to UGX 8,000, ending in 000 or 500 Ukraine 5 UAH to 4000 UAH United Kingdom £0.49 to £199.99 , ending in .49 or .99
- Set the Suggested retail price for the offer.The subscription price will be determined based on the suggested retail price. Google reserves the right to set the retail price. All new subscribers will receive a 14-day free trial.
- Decide whether to display advertisements to your subscribers.By default, YouTube does not display any advertisements with the videos to paying subscribers. If you want to include advertisements, deselect the check box in the Ads section.
- Click Create offer.The new offer appears as an active offer on the Paid Subscriptions page.
- Repeat steps 2 through 7 to create additional offers for this channel.You can create up to two offers for each country, one Monthly offer and one Yearly offer. For example, you might create a Yearly offer that provides a discount over the Monthly price. You can’t create more than one offer for the same country and billing period. If you create monthly and yearly offers for the same country, the two offers must have the same advertisement policy.
Note that you can’t change the terms of an offer once you have created it. If you want to raise or lower the subscription price for a channel, you need to disable the existing offer and create a new one with the new terms.
Create video rental or purchase offers
To rent or buy a paid video, a user chooses an offer. The offer determines the terms of the rental or purchase: how much it costs, how long the rental period is, and which country it is available in. You must define one or more offers before users can rent or buy the paid video.
To create a rental or purchase offer:
- Create the paid video by clicking the Require purchase or rental to view check box.If you haven’t yet enabled paid content, you’ll need to complete that action first.
- Click Create offer.
- Select the Country in which this offer is valid.To make offers available in multiple countries, you must create the offer separately for each country.
- Specify whether you’re offering the video for Rental or Purchase.
Offering your video for purchase means that buyers have perpetual access to view it. You must keep this video available to those who have purchased it. However, you can always make the video unavailable for new purchases by deleting the offers on it.
- For rental videos, choose the Rental duration.You can offer rentals for 48 hours or 72 hours.
- Set the Suggested retail price for the offer.The purchase price will be determined based on the suggested retail price. Google reserves the right to set the retail price.
The available prices are in the currency of the selected country. The retail price must meet the requirements for that country.
Country Valid retail prices United States $0.49 to $299.99, ending in .49 or .99 Australia $0.49 to $399.99, ending in .49 or .99 Argentina $9.90 to $2999.90, ending in 9.90 Brazil R$0.90 to R$700.90, ending in .90 Bosnia and Herzegovina 1 BAM to 500 BAM Canada $0.49 to $299.99, ending in .49 or .99 EUR countries
(Austria, Belgium, Finland, France, Greece,
Ireland, Italy, Netherlands, Portugal,
Slovenia, Slovakia, Spain)€0.49 to €299.99, ending in .49 or .99 Hong Kong HK$8 to HK$8888, ending in 8 Hungary 100 HUF to 8000 HUF India ₹5 to ₹20000, in multiples of 5 Japan ¥100 to ¥30000, in multiples of 100 Macedonia 40 MKD to 14000 MKD Mexico $9 to $3999, ending in 9 New Zealand $0.95 to $399.95, ending in .95 Philippines ₱10 to ₱20,000, in multiples of 10 Poland zł5.00 to zł999.00, ending in 5 or 9 Russia 19 RUB to 9999 RUB Scandinavia
(Denmark, Norway, Sweden)9 kr. to 1999 kr., ending in 9 Senegal 10 CFA to 200000 CFA, in multiples of 10 South Korea ₩100 to ₩350000, in multiples of 100 Switzerland CHF .90 to CHF 299.90, ending in .90 Taiwan $9 to $9,999, ending in 0 or 9 Uganda UGX 1,000 to UGX 8,000, ending in 000 or 500 Ukraine 5 UAH to 4000 UAH United Kingdom £0.49 to £199.99 , ending in .49 or .99 - Click Create offer.The new offer appears as an active offer on the video’s Monetization page.
- Repeat steps 2 through 7 to create additional offers for this video.You can create up to two offers for each country, one Rental offer and one Purchase offer.
- Add a promotional trailer for the video (optional).We recommend adding a trailer to attract viewers and provide a free preview of your paid video. Click Select trailer on the Monetization page and select the trailer video.

Note that you can’t change the terms of an offer once you have created it. If you want to raise or lower the price, you need to delete the existing offer and create a new one with the new terms. New offers may take up to an hour to appear on your video.
Apply content ratings
Content ratings enable customers and prospective customers to assess how family-friendly the videos on your channel are. Some countries require that you rate all paid content, and it’s good practice to rate all of your content.
You rate the content of your videos by applying a YouTube content rating, which identifies any mature content in six categories: Strong language, Nudity, Sexual situations, Violence/disturbing, Drug use, and Flashing lights. For TV and movie content, you may also have received ratings from one or more official ratings organizations.
To apply a content rating to a video:
- Sign in to YouTube with a user name that is linked to your YouTube content owner.
- Navigate to the Video Manager.
- Click the Edit btn next to the video you want to apply a content rating to.
- Click the Content rating tab.
- To apply a YouTube content rating, click Specify rating, then choose the appropriate option in each of the six ratings categories.
- To apply a rating from an official ratings organization, click the box that corresponds to the rating that the video received.Hover over a box to see a short description of the rating. Repeat this step for each ratings organization from which you have received a rating.
- Click Save changes.
You have the option to apply the same YouTube content rating to multiple videos at the same time:
- On the Video Manager page, select the check box next to the videos you want to apply the rating to.
- Click Actions > Advanced, then choose YouTube content rating from the list of available actions.
- Click Specify rating, then choose the appropriate option in each of the six ratings categories.
- Click Submit to apply the rating to the selected videos.
Disable a paid channel
You can disable a paid channel if you decide that it no longer works for your monetization or content creation strategy.
When disabling a paid channel, you need to decide whether you want to make the channel and its videos unavailable or want to convert it to a free channel, possibly with its videos monetized through advertising. You must also decide whether you want to disable the paid channel in all countries where you have offers or only in some countries.
To disable a paid channel and make it unavailable:
- Go to the Paid Subscriptions page.
- Click the Delete btn next to all offers for countries in which you want to make the channel unavailable.When you delete an offer, all existing subscribers are unsubscribed, effective at the end of their current billing period. These customers will be notified via email. The offer is no longer available for new subscribers.
You must keep the content in this channel available until the end of the last customer’s billing period.
To convert a paid channel into a free (or ad-supported) channel:
- Go to the Paid Subscriptions page.
- Click Make channel free.Making the channel free allows all YouTube users to subscribe to your channel and view its content for free. Existing subscribers will continue to be subscribed, but will not be billed for future billing cycles.
After making the channel free, you have the option to enable advertisements on your videos to earn advertising revenue from your channel.
For more information on Multi Channel Network’s and YouTube how to videos please check back weekly or subscribe here.