What is a claim?
A claim links a video to a particular asset and its ownership information, allowing the asset owner(s) to set a policy(monetize, track, block) on the video.
Broadly speaking, there are two sources for videos:
- Partner-uploaded content is videos that you upload to a YouTube channel that you own. You claim the video as you upload it, and apply a usage policy to it. Claiming partner-uploaded content enables monetization options, Content ID matching, and reporting.
- User-generated content (also known as UGC) is videos that other people upload to their channels. When the video contains content that you own (as determined by a Content ID match or a manual claim), you claim the video and apply a match policy to it. The match policy determines where and how the video is available on YouTube.
Categories of claims
A claim is an application of a policy (monetize, block, track) to either a reference file or a user-uploaded video. By claiming content, you are indicating that you own exclusive rights to distribute that content online in the country (or countries) where the policy applies.
You can filter claims by:
- Active claims – All active claims associated with your Content Manager account.
- Potential claims – Possible claims, short matches and claims routed for review because of a partner’ provided policy.
- Disputed claims – Claims that have been protested by the users who uploaded the claimed content. YouTube will not enforce a disputed claim until you have reviewed it.
- Appealed claims – Claims that the user is appealing after you reinstated the claim upon dispute.
- Takedown claims – Claimed videos that have been taken down pursuant to a takedown order.
- Inactive claims – Claims that have become inactive. For example, if a user deletes a video you have claimed, the claim becomes inactive.
Claim your videos
To claim a previously uploaded video:
- In the Video Manager, click the $ icon next to the video you want to claim.
- Set the usage policy to associate with this video.Click the Usage policy check box and choose the policy from the drop-down list. The list shows the policies available in your account, with your default usage policy selected (or Track in all countries if you don’t have a default usage policy). Select a different policy to override the default.
- Click Save changes.
If the policy associated with your claimed videos is Monetize in all countries, you can claim and monetize multiple videos at the same time:
- In the Video Manager, click the check box next to the videos you want to monetize.You can select both claimed and unclaimed videos. For previously claimed videos, this action updates the usage policy without affecting the match policy or asset ownership information.
- From the Action menu, select Monetize.
Upload and claim your videos at youtube.com
The process of uploading a video to YouTube has a few extra steps for a YouTube content partner. In addition to processing the video, YouTube also creates a new asset, claims the video for the new asset, and applies a policy that specifies how to handle the video.
To upload a video as a YouTube content partner:
- Sign in to YouTube with a user name that is linked to your YouTube partner account.
- Click the Upload link at the top of the page.
- Select the video you’d like to upload. You can click the large up-arrow icon to open a file selection dialog box or drag-and-drop the video file onto the page.As YouTube uploads the video file, the Edit details page for the video appears. You can optionally add a title, description, or tags for the video and set its privacy status.
- Click the Monetization tab.
- Specify the type of asset to create for this video.YouTube recognizes different asset types based on the type of content they represent, such as music videos, web videos, and movies. The Asset information section at the bottom of the page has a radio btn for each available asset type, with the default asset type for your account selected. To change to a different asset type, click the radio btn next to the desired asset type.
You can’t change the asset type once you save it at step 8.
- Set the policy to associate with this video.The Usage policy drop-down list shows the policies available in your account, with your default usage policy selected (or Track in all countries if you don’t have a default usage policy). Select a different policy to override the default.
- If you are registered for YouTube’s Content ID system, specify whether to create a reference from the uploaded video.To enable Content ID matches for this asset, select the Enable Content ID matches check box and select a Match policy from the drop-down list. (These controls do not appear if you are not registered for Content ID.)
- Click Save changes.
Manual claiming
The Manual claiming tool enables you to search through publicly available YouTube videos, looking for videos that include your content. You can claim the content and apply a policy to it.
To search for videos that match your assets:
- Go to the Manual claiming page.
- Enter search criteria in the search box in the upper right.You can enter keywords in the search box, which YouTube will try to match to video titles, descriptions, tags and other metadata. You can also click the down-arrow btn next to the search box to apply filters based on other criteria, such as the length of the video, its claim status, or upload date.
- Click the magnifying glass icon to perform the search.Videos matching your search criteria appear in the results list. Videos that have an active claim on them show the name of the claiming asset at the right end of the row.
- Choose how to sort the search results.The Sort drop-down lets you specify whether to sort the results based on Relevance, Date uploaded, Lifetime views, orRating.
- Click the Play btn that appears when you hover the cursor over the video thumbnail.You want to watch the video to confirm whether it includes content that you own. Next to the video you’ll see four tabs:Claim, Takedown, Uploads, and Related videos.
- To claim a video that includes your content:
- Click the Claim tab.
- Click the magnifying glass next to the Asset search box.
- Click the row (not the title) for the asset that the video matches.
- In the Claim Type box, specify whether the video matches the Audio, Video, or Audio visual content of your asset.
- Choose the policy to apply to the video from the Policy drop-down list.
- Click Claim.
Certain content licensed to YouTube is not available for third-party claims. In such cases you see the message This video is not eligible for additional claims. You may still issue a takedown. - To issue a takedown against a video that includes your content:
- Click the Takedown tab.
- Click the magnifying glass next to the Work allegedly infringed search box.
- Click the row (not the title) for the asset that the video matches.
- Enter your name in the Signature box.
- Click the check box to acknowledge the legal statement.
- Click Takedown.
- To search for other videos from the user who uploaded the current video, click the Uploads tab.
- To review the recommended videos that YouTube displays on the YouTube watch page for the current video, click theRelated videos tab.
Ad format settings for user-generated content
Our ad serving policies on claimed content are as follows:
- Videos with at least an 80% visual or audiovisual Content ID match will continue to be eligible to show in-stream ads.
- Videos claimed with at least an 80% audio Content ID match and at least 5,000 views will be eligible to show in-stream ads.
- Videos claimed by Descriptive Search or less than an 80% Content ID match will now be eligible to show in-stream ads if they have over 10,000 views.
- We will not allow in-stream ads on a video with less than an 80% Content ID match or a Descriptive Search claim if the video has less than 10,000 views. However, we do allow partners to monetize this content with overlays, display ads, and TrueView in-display.
Here’s how you can control ad enablement settings for claimed user-generated content:
- Go to the Settings Overview page for your content owner.
- Click the pencil icon for the Ad formats for user-uploaded content section.
- Click the check box next to each of the ad formats you want to allow for claimed user-generated content.We recommend allowing all ad formats, to maximize your earnings. Different ad formats may yield different amounts of revenue and affect video viewership differently.
- Click Save.
Search your claimed videos
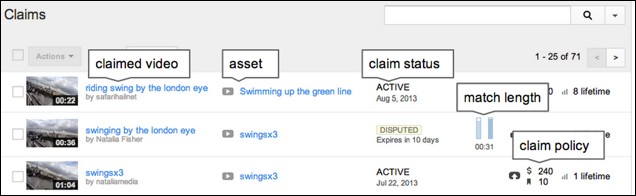
You can find a complete list of videos you have claimed in the Claims section of the Content ID menu.
The claim list view contains important and useful information about the videos being claimed, including information about the claim status, match length (for audio, video, or melody match claims only), and information about the policy applied (monetize, track, or block) on a per territory basis.
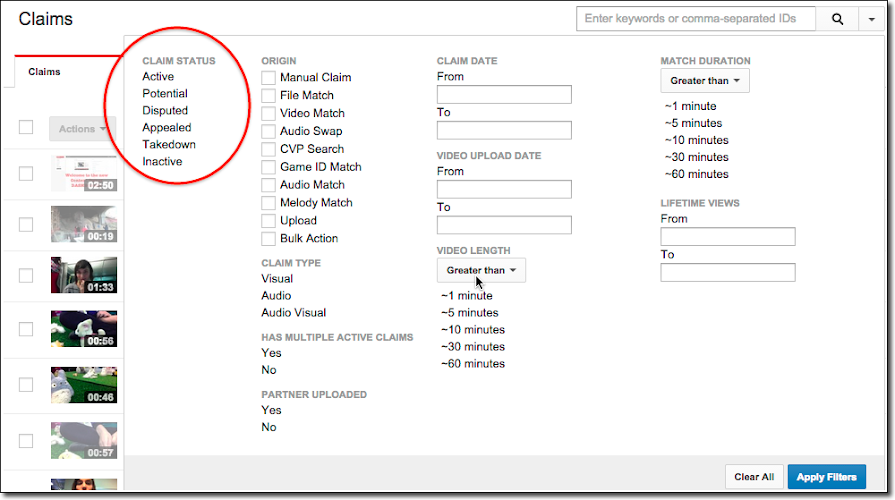
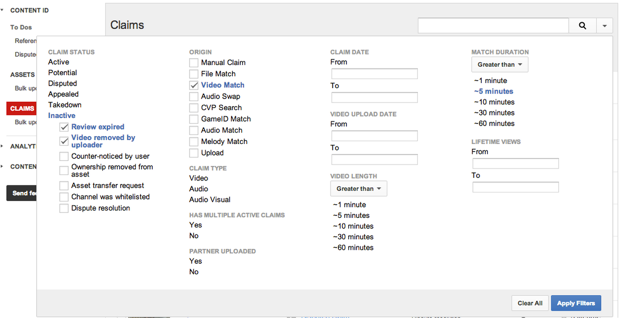
Filter and search for claims
You can search for specific claims using keywords or use filters to view claims that match the selected attributes. Click the down arrow next to the search bar to view the full list of available filters, including new filter criteria like match duration, video length, has 3rd party claims, as well as more granular sub filters for inactive, disputed, and appealed claims.
 Once you have selected the desired filter criteria, click Apply Filters to automatically adjust the list of claims to match those criteria. You can add additional filters as before by clicking on the arrow to open up the dialogue box or remove criteria by clicking on the x next to the condition to remove in the yellow banner above the results.
The search box also supports search modifiers as another means of returning a specific set of results, such as videoid:VIDEO_ID or channel:– USERNAME to return claims on a specific video or channel. The available search modifiers are:
assetid:– claims for the specified assetreferenceid:– claims made based on the specified referenceuserid:or@– claimed videos uploaded by the specified uservideo_id:– claims on the specified videoclaim_id:– claims based on their claim ID
Exporting claims
To export a list of your claims, apply the desired filters and select Export as CSV on the bottom of the page. Once a CSV file is generated, it will be shown as available for download, which you can do by clicking the blue Download btn to the right. To generate a new list, apply different filter criteria and export again. Export to CSV supports a maximum of 2M entries.
View and edit claim details
From the Claims list page, you can view more details about a claim by clicking on the video title or anywhere on the row for that claim. This will bring up the claim detail page, where you can view more information, change policies, or take other actions on the selected claim.
Claim information
You can view information on the policy, history, and details of a claim in the right pane by navigating to the relevant area of interest. A digest of the information available in these tabs, such as applied policy and claim type, are shown above the tabs for each section.
- Policy contains information about the owner policy and the applied policy on the video. To edit the owner policy, hover over the area and click the pencil/edit icon that appears, then select the desired policy and click Save.
- History shows when and how the claim was made, as well as any subsequent updates to the claim status.
- Details shows other information, such as Claim ID and syndication settings.
- Other Claims indicates whether there are additional claims on that video from other assets.
Match information
Match information is shown in several areas of the interface. Vertical bars indicate the percentage of the video and the reference that match, while the time listed to the right indicates the length of match. Colored bars underneath the video and reference players also visualize where the match occurs, while Play match allows for playback of user video and reference at the match offset. Additionally, content owners can see the “standing” of an uploader as indicated by the green or red circle next to the uploader’s name on top of the user video. A red circle indicates that the channel has received either a copyright strike (copyright bad standing) or Content ID global block (Content ID bad standing), while a green circle indicates good standing.
Claim actions
You can take actions on a claim from the claim detail page, including releasing, reinstating, issuing a takedown, and more depending on the context. In some cases, there are additional actions available from the dropdown arrow next to the blue btns, for example Release & Exclude, which will release the claim as well as create a reference exclusion for the matching portion. For more information on reviewing pending claims and taking action, please see this article.
Update multiple claims at once
You can perform certain operations for multiple claims at once using the Action btn on the Claims page.
To update multiple claims at the same time:
- From the Claims page, select the claims to update.Click the check box next to the names of the claimed videos. You can use filters or search to refine the list of videos.
- Click the Actions drop-down btn and select the operation you want to apply to the selected claims.The operations that you can perform are:
Release claims Releases the selected claims Claim type Specifies whether you claim the audio content, video content, or both Embedding Specifies whether the claimed videos can be embedded at other sites Syndication Specifies whether the claimed videos are viewable on all platforms or only on monetizable platforms Usage policy Identifies the policy applied to the video - Select the setting for the selected action.When you choose an action, a new dialog box appears with a drop-down list of the available settings for that action. Choose the setting you want to apply to the selected claims.
- To perform an additional action on the same set of claims, click the +Add btn and select the new action.
The +Add option is not available when you choose the action Release claims.
- Click Apply actions to submit the updates.
You can review the status of the bulk actions you’ve initiated by clicking the Bulk update status link under Claims in the left navigation menu.
Release claims
To release one or more claims:
- Find the claims you want to release.You can locate the claims on the Claims page, the Disputed claims page, the Potential claims page, or theAppealed claims page. Use filters to restrict the list if necessary.
- To release a single claim, click the video title in the claims list, then the Release btn in the title bar on the claim detail page.
- To release multiple claims at once, click the check boxes in the claims list and select Actions > Release Claims.
Clean up incorrect claims
If you’re using Content ID to identify and manage your content on YouTube, make sure to use it the right way. If you inadvertently claim videos you don’t own, you could cause issues for video creators and it could hurt your reputation in the YouTube community.
Avoid over-claiming
Most importantly, avoid over-claiming by understanding what kind of content is eligible for Content ID.
Here are some additional precautions you can take to avoid over-claiming:
- Reference exclusions: Carve out portions of reference files you don’t own
- Custom match policies: Set minimum thresholds or other parameters
- Manual review: Route certain threshold or types of claims to manual review
Clean up mistaken claims
In addition to preventing over-claiming, it’s important to clean up any old mistaken claims you may have made. Here are some best practices to help you efficiently and thoroughly clean up mistaken claims:
Reviewing disputed claims and appealed disputes is one of the best ways to identify problems.
 Be aware that one bad claim can lead you to thousands more. It often isn’t enough to release a single disputed claim. Make sure you also review the underlying reference and match policy.
For maximum cleanup efficiency, sort assets by number of active claims and review your top 25 performing assets.
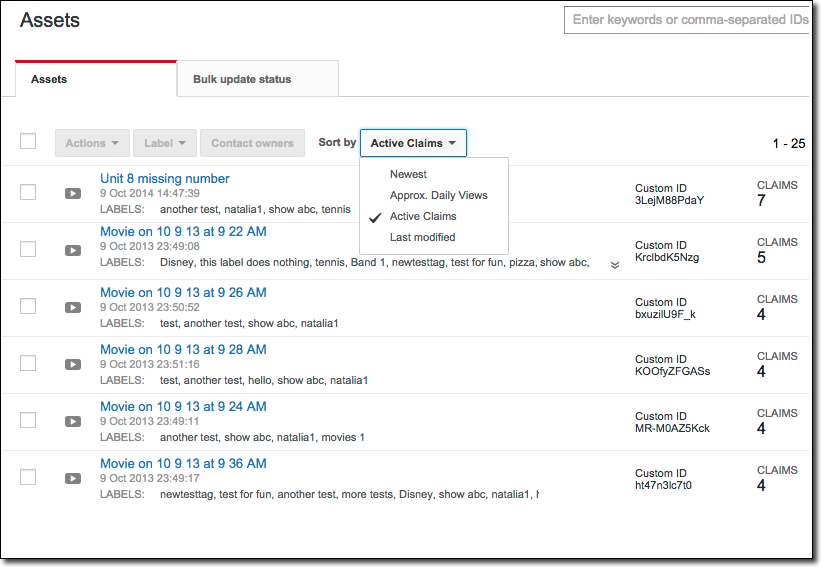 Click an asset and view active claims. Do you have 100% exclusive rights to any of the material in these videos?

- If all claims are bad, deactivate the reference and release all claims on the reference.
- If some claims are bad, release the bad claims and take additional precautions to prevent future bad claims.
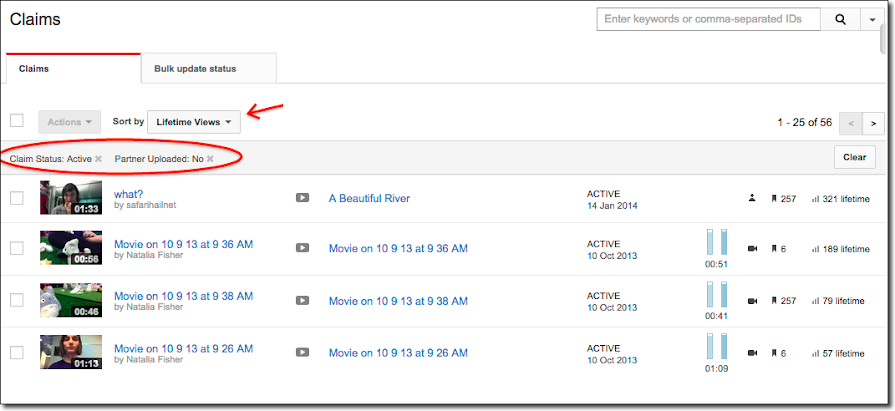
Review your top claims by sorting them by Lifetime Views.
Using the additional filters Claim Status and Partner Uploaded: No will allow you to focus solely on user-uploaded videos with active claims.
 Remember that claims will lead you to the underlying asset and reference. You will need to fix the problem at the source, not merely the individual claim.
YouTube has a number of advanced filters you can experiment with to help you discover underlying patterns of problems. Restrict your search by asset type if you think only certain kinds of assets are causing the majority of your problems.
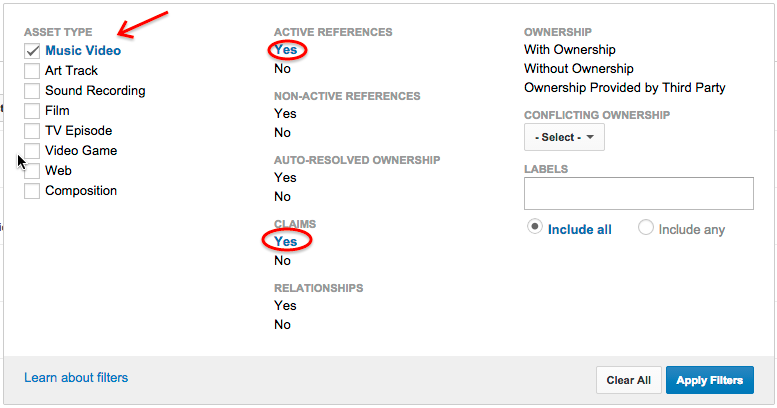 Similarly, you can restrict your search by claim status and origin. Is it only Video Matches that are the problem? Strictly Melody Matches? Experiment with the filters until you can isolate problems through pattern recognition.
Where are bad references coming from?
- A specific channel? – Consider removing that channel’s ability to create reference files
- A specific show? – Consider setting up a custom policy for that show
- A specific part of your library? (For example, a segment of your catalog that contains public domain material) – Don’t enable Content ID matching
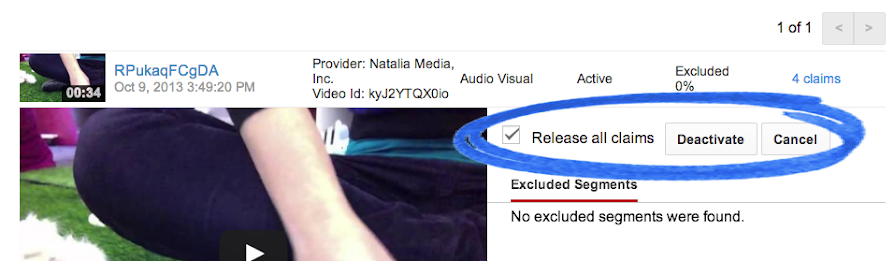
If the majority of the claims a reference makes are bad, click the Deactivate Reference btn for easy cleanup. Don’t forget to release all claims on user-uploaded videos on the reference too.
 Clicking the btn gives you an additional confirmation screen, and a checkbox to Release all claims as well.
How do I prevent a claimed video from appearing on other websites?
Select the video from the Claims list to display its claim details page. In the Claim Details box, click the Edit claim detailslink, check the Disable Embeds box, and save your changes.
How long will it take for a claim to take effect?
When applying a Content ID match policy to your videos in the Content Manager System, this policy will immediately be applied to any user generated content (UGC) uploaded following the time that the policy is implemented.
For legacy videos, which were uploaded before the implementation of the policy, it can take up to six months for our system to perform retro-scans and apply the match policy. However the recency of the UGC upload (relative to partner uploaded video) does make a difference in how soon it is claimed.
Example: If the UGC file was uploaded within the past few days, CID will likely catch it in a day or so.
Exempt channels from Content ID claims
When you enable Content ID matching, YouTube automatically generates claims against other user’s uploaded content that matches (portions of) the reference files you provide. Content ID does not claim videos you upload to your channel or to any channels associated with your YouTube content owner.
In some situations, you want to prevent Content ID from claiming videos that particular users upload. For example, a movie studio might not want to claim videos on a YouTube channel that reviews (and therefore promotes) its films. You exempt a channel from your Content ID claims by adding it to a whitelist.
To add a channel to your Content ID whitelist:
- Go to the Whitelist from matching page for your content owner.The page lists the names or external IDs of currently exempted users.
- Click the + Add btn.
- Enter the channel IDs of the channels you want to exempt from your Content ID claims.For non-Google+ identity channels, the identifier is the username; for Google+ identity channels, it is a unique alphanumeric string following the prefix UC. You can find the channel ID in the URL for the channel: www.youtube.com/user/username or www.youtube.com/channel/UCBiTuzlTyJz2XLNehfBSFsA.
To add multiple channels to the whitelist, separate the channel IDs with commas.
- Click Whitelist.The channels appear in the list on the Whitelist from matching page. Content ID will not claim any videos uploaded to these channels. YouTube does not remove any existing claims on videos on these channels.
For more information on Multi Channel Network’s and YouTube how to videos please check back weekly or subscribe here.