What is an asset?
An asset contains intellectual property, such as a sound recording or a television episode, that a content owner has provided YouTube for rights management on our platform.
Assets are not YouTube videos; they are objects containing information about that piece of intellectual property, including various metadata, ownership information, claims, policies, and the content reference files that allow the asset to match and claim content found within user uploaded videos.
There are several different types of assets, including:
- Web — Represents YouTube original video or other types of video content not covered by the other asset types.
- Sound Recording — Represents an audio recording. A sound recording has metadata like ISRC, artist, and album. It usually embeds a composition asset, and may in turn be embedded in a music video asset.
- Composition — Represents a musical composition. A composition has metadata like ISWC and writers. It is the only asset type that can have multiple owners per territory.
- Music Video — Represents the official music video for a sound recording. A music video has metadata like Video ISRC, song, and artists. A music video asset embeds a sound recording asset.
- Art Track — Represents the video of a sound recording that doesn’t have a premium music video.
- Movie — Represents a feature film. A movie has metadata like ISAN/EIDR and directors.
- Television episode — Represents an episode from a television show. An episode has metadata like season and episode number.
Selecting the correct type for your assets is important. Contact your account manager if you’re not sure which asset type to use.
Manage ownership of an asset
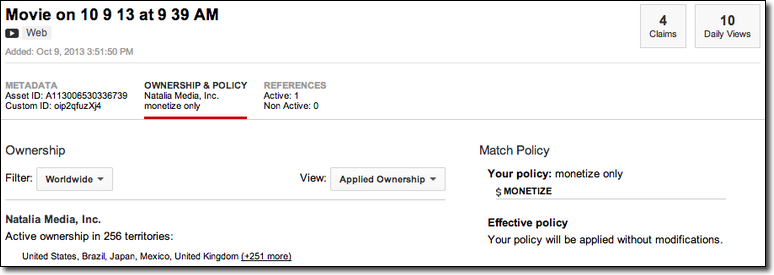
It is important to understand asset ownership and to keep the ownership information up to date. Ownership impacts the territorial application of usage and match policies for videos associated with the asset. Most significantly, your policies apply only in countries where you own the asset. For example, if your policy says to monetize a video worldwide but you own the asset in the United States only, YouTube shows advertisements on the video in the United States only.
Multiple partners can declare ownership of the same asset, as long as their ownership doesn’t overlap in any countries. YouTube applies each partner’s policies in the countries where they own the asset (see examples). If ownership claims do overlap, you’ll need to resolve the ownership conflict before your policy applies.
When you own an asset only in certain territories, you can choose to block the associated YouTube video in territories where you don’t own the asset.
You set the ownership for an asset when you deliver it using a spreadsheet template or an Content and Rights Administration Feed file. You can view or edit the ownership information on the Ownership & Policy tab on the details page for the asset.
To view or update ownership details for an asset:
- From the Assets page, select the asset whose ownership details you want to update.Click the asset name to display the details page for that asset.
- Click the Ownership & Policy tab.
The page shows the current ownership details and the match policy applied to user-generated videos claimed using this asset (if applicable). By default, the page shows the ownership actually applied to the asset in the territory shown in the Filter box, after all owners’ claims are taken into account; to see the ownership each owner provided for the asset, select As Provided from the View drop-down list.
Should you wish to contact one of the content owners listed on the As Provided view, click their name to open up a pre-populated contact form to communicate with them about the particular asset.
- To update the ownership information, click the pencil icon in the upper right corner of the Ownership section.
- Specify the territories in which you own the asset.You can list the territories in which you own the asset or the territories in which you don’t own the asset, whichever is easier. After selecting owns this asset in(the default) or owns this asset everywhere except, click in the box and select a territory. Repeat this process until you’ve selected all of the relevant territories.
- Click Save.
Find, update & export your assets
You can find the full list of your assets in the “Assets” section of your “Content ID” menu.
Filter and search for assets
Use the filters dropdown to quickly view whole categories of assets or refine your search results. This menu will also let you toggle between searching within assets that you own and searching all the assets of all the content owners on YouTube. To view the full list of filters available, click the arrow next to the asset search btn.
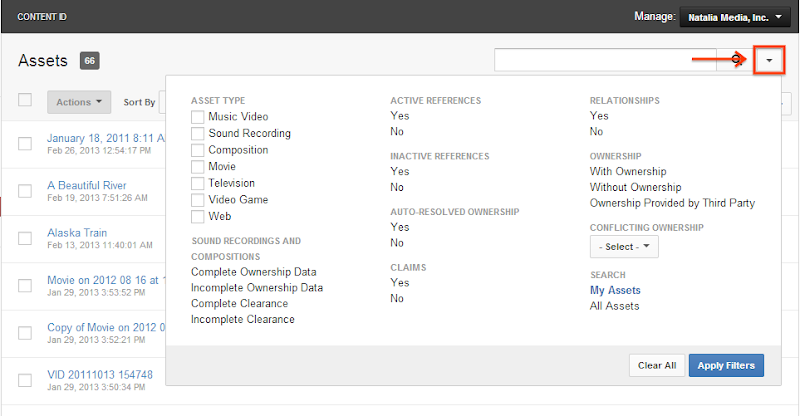
Once you’ve selected your filter criteria and clicked Apply Filters, your asset list will automatically adjust to display results matching those criteria. You can add search queries and modifiers to refine the results even further. The filters that you’ve selected will appear in a yellow banner above the resulting list of assets being displayed. To remove one of the filters, click the X next to it.
You may also search for individual assets, or groups of assets on the Assets page by using the search menu located at the top-right of the page.
Asset search modifiers
Asset search supports a variety of keywords that can search for specific asset characteristics. Simply type them into the asset search field, using the following syntax:
Note, there are no spaces between the search modifier, the colon and the search term.
Export assets
At any point, you can export the list of assets being displayed on the Assets tab in .CSV format. To do so, click the Export as CSV link below your asset list. You will be able to track the status of your export as it progresses.
Once your export is complete, you may download the .CSV file. The file will contain details about each of your assets, similar to the information you’d see in an Asset Report downloaded from cms.youtube.com.
View and edit your assets
You can review and edit an asset’s various components and their associated details by clicking the hyperlinked asset title on the Assets tab. Additionally, you can view basic, at-a-glance information about the asset (including ownership, related assets, and references) simply by hovering over it.
Navigating Content ID’s asset detail page
Clicking an asset will take you to its asset detail page, where you can view and edit information associated with that asset, or perform tasks like resolving ownership conflicts.
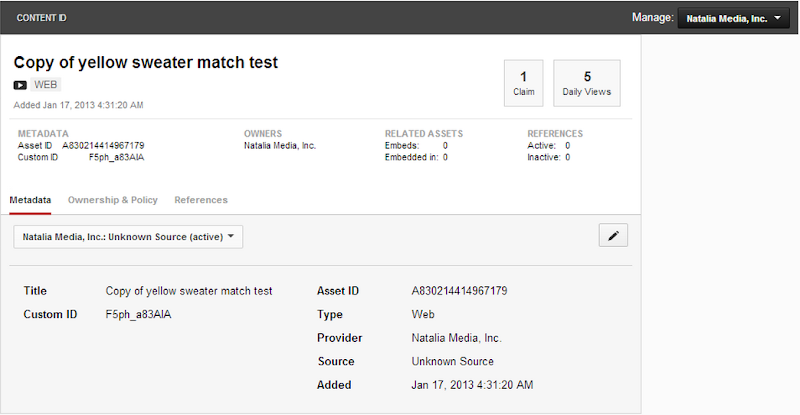
The asset detail page’s top section displays basic information about several of the asset’s components, including the asset name, type, date added, metadata, ownership, and the match policy designated for the asset’s reference material. It will also display the number of related assets and the number of active and inactive references associated with the asset. Finally, information about the number of claims and total daily views associated with the asset will be shown as well.
Edit details related to each of the asset’s components:
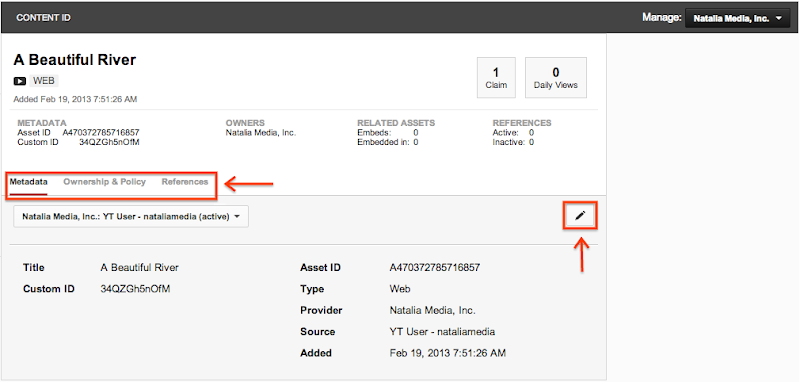
- On the asset details page, click the appropriate tab.
- Click on the pencil/edit icon in the upper right hand corner to edit the asset component’s information.
- After making your desired updates, click Save. Please note your ability to edit information is limited to the assets, or the components of others’ assets, that you own.
Tabs available on the asset detail page
Metadata
Metadata is the default tab selected on the asset detail page. It contains high-level information about the asset, such as its title, ID, type, artist(s), provider, and date added (see above). As mentioned, edit permissions to certain items depend on your ownership of the particular asset.
Ownership & Policy
On the Ownership & Policy tab, you can view and edit ownership information for an asset, along with the match policies designated for claims based on that asset. You can also use this tab to look up and contact asset owners. See Manage ownership of an asset for more information.
References
The References tab enables you to manage the reference that Content ID uses to match and claim user generated content.
Related Assets
Related assets are additional assets that may be embedded in or linked to another asset in some way. For example, a Sound Recording asset may have a Composition asset listed on the “Related Assets” tab.
Update multiple assets at once
You may wish to update certain asset information across multiple assets, which you can do with the bulk update function.
To update multiple assets at once:
- Select the assets you wish to update by checking the boxes next to each asset.If you want to update all displayed assets, click the checkbox above your asset list to the left of the Actions drop-down list.
For example, you can use asset search filters to show a specific set of assets, then select and edit them all simultaneously, or select specific assets within that subset, as in the screenshot below.
- From the Actions drop-down list, select the item you want to update for the selected assets.For example, to set the match policy for the assets, select Match Policy.
- Make the desired changes to the selected assets on the subsequent screen.When you set a match policy, by default the change applies only to Content ID claims. To apply the new match policy toall user-uploaded videos, select the option Update all user uploaded videos claimed against these assets. Note that match policy changes do not affect usage policies for content you upload.
- Click Apply Actions to submit the changes.

You may review the bulk update jobs you’ve initiated, and their current status, by clicking the Bulk update status page under your Assets section.
Using asset labels
Labels help you organize your assets into custom categories. You can search for assets based on their labels, update all assets with a particular label, create campaigns for labeled assets, view performance reports or analytics, or simply use labels to organize your asset library.
You can apply up to 30 labels to an asset, up to a total of 5000 labels per content owner.
Create a label
To create a label that you can add to assets:
- Go to the Assets list page for your YouTube content owner.
- Select one or more assets to apply the new label to, by clicking the check box next to the assets.
- Click the Labels drop-down.A list of your previously created labels appears.
- Enter the text of the new label in the search box at the top of the list.The label needs to have at least two characters and no more than 30 characters. The label text can include spaces; prohibited characters are angled brackets, commas, colons, ampersands, and the vertical pipe character (|).
- Click “your label name” (create new) below the search box.YouTube creates the label and applies it to the assets you selected at step 2.
Add labels to assets
To add existing labels to one or more assets:
- Go to the Assets list page for your YouTube content owner.
- Click the check boxes next to the assets you want to add labels to.
- Click the Labels drop-down.A list of your labels appears.
- Click the check box next to each label you want to add to the selected assets.You can filter the list of labels by entering text in the search box. As you type, the list displays only matching labels.
- Click Add.YouTube adds the labels to the assets you selected at step 2.
You can also add labels to assets using the <asset_label> tag in the Content and Rights Administration XML feed.
Delete labels
To delete an asset label:
- Go to the Labels list page for your YouTube content owner.
- Select the row for the label you want to delete.A list of the assets using the label appears.
- Click the garbage can icon next to the label name at the top of the page.
- Click Delete in the confirmation dialog box.Deleting a label is irreversible. It removes the label from all assets, claims, and campaigns that use it.
View the assets, claims, and campaigns that use a label
The Labels page lists all of your labels and shows how many assets, claims, and campaigns currently use the label. Click on the row for a label to view a list of the assets that have that label; click campaigns or claims to view a list of the other items that use the label.
Asset labels in reports
The video and asset performance reports include an Asset Labels column, which enables you to filter or group items by your asset labels.
Create campaigns
A campaign offers a way to promote your content from user-uploaded videos. When Content ID claims a user-uploaded video on behalf of an asset that is part of a campaign, it adds an annotation that directs the viewer to your content. For example, you could create a campaign that adds a link to your movie’s watch page whenever Content ID claims a video that includes scenes from that movie. A YouTube content owner can create up to 5000 campaigns.
A campaign can apply to all of your assets or just to selected assets. The annotation can direct viewers to a specific video (including a transactional video) or to a channel page. You can create multiple campaigns for different collections of assets, along with a default campaign that applies for assets that aren’t part of another campaign.
To set the default campaign:
- Go to the Campaigns page.
- Click the pencil icon to the right of the Default campaign.
- Choose whether to Do nothing or Feature official videos on fan uploads by default.If you choose Feature official videos on fan uploads, YouTube adds an annotation that links to the reference for the asset making the claim.
The annotation appears only for assets that have a playable reference. If the asset’s reference is set to Private or isn’t available as a playable YouTube video, no annotation appears for videos claimed with the asset.
- Click Save.
To create a campaign:
- Go to the Campaigns page.
- Click New campaign and choose a method for identifying the assets for the campaign.Choose Label-based campaign to select all assets that have particular asset labels applied to them or Asset-based campaign to select individual assets one-by-one. (Label-based campaigns will also apply to assets you apply the label to after creating the campaign.)
- Enter a name for the campaign in the Campaign title box.
- In the Featured content box, enter the full URL of the video watch page or channel page you want to direct viewers to.
- Enter a date range during which you want the campaign to run.Click in the left Date box and choose a starting date from the popup calendar, then click in the right Date box and choose an end date.
- Click the Label-based campaign or Asset-based campaign btn to add assets to the campaign.A dialog box appears with a list of your labels or assets.
- Click the check box next to the labels or assets you want to include in the campaign, then click the Add selectedbtn.The dialog box closes and the selected items appear at the bottom of the campaign definition.
- Click Save.
For more information on Multi Channel Network’s and YouTube how to videos please check back weekly or subscribe here.